Posts tonen met het label Github. Alle posts tonen

dinsdag 8 december 2020

Introduction to GIT

Introduction

Today, a quick introduction in Git. In this blogpost a couple of familiar Git commands will pass and I will demonstrate the commands in small demos.


Installation

But first download the software of Git to your local machine and install the software locally. Verify the installation by using the following command : "Git version". This will return the current version of Git. 


git version


In my case this results in the following version 2.28.0.


Demo

For this blogpost I created a folder with some files and I will experiment with these files : FileA, FileB and FileC.


And in every file I inserted the following phrase. This is and example for File A:


This is File A


Initialize the repository

When the file are there, the first statement that needs execution is Git init. This command creates an empty Git repository (basically a .git directory with subdirectories for objects, refs/heads, refs/tags, and template files. An initial HEAD file that references the HEAD of the master branch is also created.


Git init


A message appears when the initialization is ready. 


Running git init in an existing repository is safe. It will not overwrite things that are already there. The primary reason for rerunning git init is to pick up newly added templates.


Add the files to the repository

With git add you can add the files to the l(local) repository. It typically adds the current content of existing paths as a whole. This command updates the staging area (index) using the current content.


git add .


And now the files are added to the staging area. The git status command displays the state of the working directory and the staging area. It lets you see which changes have been staged, and which haven’t, and which files aren’t being tracked by Git. The Git status output does not show you any information regarding the committed project history. For this, you need to use git log.


git status


Here the result of the git status. The files are in the staging area but they need to be committed.


The "commit" command is used to save your changes to the local repository. Creating a new commit containing the current contents of the index and the given log message describing the changes. The new commit is a direct child of HEAD, and the branch is updated to point to it,

git commit -m "new files"


Here the result of the commit of the files.


Now let's check the commit with "git status".

git status


So what have we done so far? We have added the files from the working directory to the staging area (aka index) with the "git add" command and with "git commit" we added the files from the staging area to repository.


Check this out with the "git log" command.

git log


Change the file

Now let's edit the file FileA with some changes.


Save it and check the status with "git status".

git status


Git status reports that FileA is changed and these changes are not added and commit to the repository.


Let's add the file to the staging area with "git add".

git add FileA.txt
git status


"Git status" reports that the file is changed and add to the staging are, now. But they need a commit to the repository.


So, let's commit the changed to the repository with the "git commit" command.

git commit -m "FileA is changed"
git status
git log


And here is the result of the "git log". There are now two commits and HEAD is poinitng to the master. 


The next step is changing fileC and add this file to the repository.


Execute the following commands and see the results. One command I haven't explained yet is git diff. From the Git site : "Show changes between the working tree and the index or a tree, changes between the index and a tree, changes between two trees, changes resulting from a merge, changes between two blob objects, or changes between two files on disk".

git status
git diff
git add FileC.txt
git commit -m "FileC- Changed"
git log


And now there are three commits and changes


It is also possible to go back one (or more) version of the code. You can execute this with
"git checkout" command.

git checkout b81a42d23c48657dc976372d989a09e9cb6022ed


And now the original file is back.


git log


It's not possible to see the successors of the commits with "git log", now. Now let's go back to the last changes 

git checkout b81a42d23c48657dc976372d989a09e9cb6022ed


And now the last commit file is back


And with "git log" we see that we are back on the latest commit of the master branch.

git log


Used resources 

For this blogpost I've used the following resources :

Final Thoughts

This is a small introduction to git. 

Hennie

dinsdag 6 augustus 2019

DevOps series : tSQLt, Visual Studio and Azure DevOps

Introduction

Currently using and investigating tSQLt in a data warehouse project in a complicated environment with multiple developers, datamodellers and testers. I decided to investigate on how using Visual Studio together with the tSQLt framework and using that in Azure DevOps. This blogpost is just one step in the process of researching tSQLt  together with Visual Studio and Azure DevOps. I'm not stating that this is the final solution on how to DevOpsing with tSQLt. Finetuning alert ahead ;-) I'll blog about that in the future. I am using AdventureWorksLT2017 as an example project for this experiment.

I'm not covering all of the details of tSQLt, Visual Studio and Azure DevOps, but I will show how to set up a project with AdventureWorksLT2017, tSQLt framework and together with some tests in Visual Studio end Azure DevOPs

Inspiration for this blog is from Nikolai Thomassen. I found more information from blogposts like these from Sandra Walters and Medium.com. Many thanks to these contributors.

The local environment

I've a VM with a development environment together with Visual Studio 2017 professional, SSDT installed, SSMS with Git support, connected with Azure DevOps. On this machine, I've created a set of Visual Studio projects and databases. I've depicted that in the following diagram.


So there are a couple of parts in this diagram :
  • The visual studio project (green boxes).
  • Database references (green lines).
  • Deployment to the different database projects (blue lines and blue cylinders).

The Visual Studio project

I've created one solution with three projects:
  • AdventureWorksLT2017. This is the development project where all of the database code is stored. It contains the table definitions, views, stored procedures and all other database objects. 
  • AdventureWorksLT2017.framework.tsqlt. This is the project where the framework is installed. one of the reasons doing so, is that you can update the framework regardless of the tests and the database project. 
  • AdventureWorksLT2017.tests. This is the project where all the test definitions aka the unittesting procedures are stored.


Now, this setup will make sure that the different parts of the project are deployed in their targeted environment. One of the issues I had, when I started is that the tSQLt was installed at my development database and with this setup. The development code (AdventureWorksLT2017) is now more separated from the tSQLt code and test procedures (AdventureWorksLT2017_CI).

Importing the TSQLt in your project can be a bit tricky but I assume you can do it!

Database references

Now, in order to make this work it is necessary to set up the projects with a so called composite project. Composite projects are projects that are part of a database. Normally a Database Reference (as it says) is a reference to a whole database : a project is a database. This can be very unhandy.

For composite projects it is necessary to set up a Database Reference with Database Location set up : "Same Database".


Deployment to databases

I've created some publish files at my projects for deploying the projects to the databases. I've created them for my local deployment but these can also be used in the Test release or other release environment.


The testproject

Now, the testproject is not much different than that of Nicolai. I've created a test procedure that will test whether a value of color is inserted in the column Color with the stored procedure InsertProduct.


CREATE PROCEDURE [tsqlttests].[test_insert_Product_check_if_color_is_inserted ]
AS 
BEGIN

--ASSEMBLE
DECLARE @Name   NVARCHAR = 'Car';
DECLARE @ProductNumber NVARCHAR = '12345';
DECLARE @StandardCost MONEY = 1 ;
DECLARE @ListPrice      MONEY = 2;
DECLARE @SellStartDate DATETIME = '2019-07-31';
DECLARE @Color   NVARCHAR (15)  = 'Yellow';
--ACT

EXEC SalesLT.InsertProduct 
  @Name    = @Name
    ,@ProductNumber  = @ProductNumber 
    ,@Color    = @Color
    ,@StandardCost  = @StandardCost
    ,@ListPrice   = @ListPrice
    ,@SellStartDate     = @SellStartDate

--ASSERT
DECLARE @Actual NVARCHAR = (SELECT TOP 1 Color FROM SalesLT.Product)


EXEC tSQLt.AssertEqualsString @Color, @Actual, 'Color name was not saved when @color was given'

END;


This stored procedure is shown below :


CREATE PROCEDURE SalesLT.InsertProduct
(
  @Name     [dbo].[Name]   
    ,@ProductNumber          NVARCHAR (25)    
    ,@Color                  NVARCHAR (15)
    ,@StandardCost           MONEY  
    ,@ListPrice              MONEY
    ,@Size                   NVARCHAR (5)
    ,@Weight                 DECIMAL (8, 2)
    ,@ProductCategoryID      INT
    ,@ProductModelID         INT  
    ,@SellStartDate          DATETIME 
    ,@SellEndDate            DATETIME  
    ,@DiscontinuedDate       DATETIME   
    ,@ThumbNailPhoto         VARBINARY (MAX)
    ,@ThumbnailPhotoFileName NVARCHAR (50) 
)
AS 
BEGIN
SET NOCOUNT ON;


SET NOCOUNT OFF;
END


The procedure will not insert a value and therefore the test will go wrong.

The DevOps Environment

The next step is setting up the Azure DevOps environment. I assume you have some basic knowledge of Azure DevOps. I'm not showing all of the basics here. In the following diagram, I'm showing a basic Build, Test and Release process that we are going to follow.


We have a local environment and we have a DevOps environment. The local environment is already described in the previous section. So what will happen when we are done, is that the code is committed to the Git database, where the build process is started to make sure that code is correct. Next step in the process is that the code is deployed to a CI environment. This will be executed with the dacpac from the test project. When the tests are done, it will deploy to TST environment for user testing.

The build process

The build process is executed in the Build part of Azure DevOps. Now, I'm not sure where Microsoft is heading with this, but it seems that YAML code writing will be the preferred way, in contrast with a half a year ago, when click and go was the way doing it. I've created the following YAML script:


pool:
  name: Hosted Windows 2019 with VS2019
  demands: msbuild

variables:
  BuildConfiguration: 'Debug'

steps:
- task: MSBuild@1
  inputs:
    solution: '**/*.sln'
    msbuildArguments: '/property:DSP="Microsoft.Data.Tools.Schema.Sql.SqlAzureV12DatabaseSchemaProvider"'

- task: CopyFiles@2
  displayName: 'Copy Files from Build to Artifact folder'
  inputs:
    SourceFolder: ''
    Contents: '**\bin\$(BuildConfiguration)\**.dacpac'
    flattenFolders: true 
    TargetFolder: '$(Build.ArtifactStagingDirectory)'

- task: PublishBuildArtifacts@1
  displayName: 'Publish Artifact: AdventureWorksLT2017'
  inputs:
    ArtifactName: 'AdventureWorksLT2017'

Notice the msbuild argument : /property:DSP="Microsoft.Data.Tools.Schema.Sql.SqlAzureV12DatabaseSchemaProvider". This is necessary to build the code for Azure databases. Locally I'm using SQL Server 2016  and I want to keep it that way, but when I deploy the code to Azure I must have to be Azure compatible. More information at medium.com.

The build process will deliver three (or four) dacpacs. These will be used for the release process.


The release process

I've setup the release process in two steps. One release and test on the CI database and one on the TST database. These database have different goals. The CI database uses the test dacpac and the TST database uses the AdventureWorksLT2017 dacpac. This makes sense because you don't want to deploy the test procedures to the TST database. So, the process is depicted below.


First step is to get the artefacts from the Artefacts folder and this is passed to the CI and TST release process.

The steps in the CI release process are presented below :


Most of the steps are quite straightforward. I borrowed the Powershell script from Nicolai and it worked like a charm.


$connectionString = "Server=tcp:devhennie.database.windows.net,1433;Initial Catalog=AdventureWorksLT2017_CI;Persist Security Info=False;User ID=xxxxxx;Password=xxxxxxxx;MultipleActiveResultSets=False;Encrypt=True;TrustServerCertificate=False;Connection Timeout=30;"

$sqlCommand = 'BEGIN TRY EXEC tSQLt.RunAll END TRY BEGIN CATCH END CATCH; EXEC tSQLt.XmlResultFormatter'

$connection = new-object system.data.SqlClient.SQLConnection($connectionString)
$command = new-object system.data.sqlclient.sqlcommand($sqlCommand,$connection)
$connection.Open()

$adapter = New-Object System.Data.sqlclient.sqlDataAdapter $command
$dataset = New-Object System.Data.DataSet
$adapter.Fill($dataSet) | Out-Null

$connection.Close()
$dataSet.Tables[0].Rows[0].ItemArray[0] | Out-File "$(System.DefaultWorkingDirectory)/_AdventureWorksLT2017/AdventureWorksLT2017/testresults.xml"


I've executed the following script, in order to retrieve the output.


BEGIN TRY EXEC tSQLt.RunAll END TRY BEGIN CATCH END CATCH; EXEC tSQLt.XmlResultFormatter

This is the output. This is readable by the test process in Azure DevOps.


<testsuites>
  <testsuite id="1" name="tsqlttests" tests="1" errors="1" failures="0" timestamp="2019-08-07T06:55:29" time="0.077" hostname="devhennie" package="tSQLt">
    <properties />
    <testcase classname="tsqlttests" name="test_insert_Product_check_if_color_is_inserted " time="0.077">
      <error message="Procedure or function 'InsertProduct' expects parameter '@Size', which was not supplied.[16,4]{SalesLT.InsertProduct,0}" type="SQL Error" />
    </testcase>
    <system-out />
    <system-err />
  </testsuite>
</testsuites>


When the testing is done, an overview is created in the Test tab in Azure DevOps. This is a nice integration with tSQLt and Azure DevOps.


Final thoughts

It was quite some work to figure it out but it was fruitful in the end. I had some great help with this blog from Nikolai Thomassen. He described some tweaks that I didn't know. I learned some interesting stuff again!

Hennie

woensdag 15 juni 2016

What is Github?

Introduction

GitHub is a code hosting platform for version control and for collaboration. You can work together on projects from any place you want. Now once in a while, I'm using Github for working on my R skills For exercises in the course I need to create and maintain a Github repository. A repository is a usually a project and it can contain files and folders.

Now as I said, I'm not an user that often uses Github and therefore I wrote this blog. There are a couple of steps that you have to do in order to check in your code, in short:
  1. Create the Github account.
  2. Install the Github Desktop.
  3. Create a repository.
  4. Copy the files in the Github folder.
  5. Commit the code.
  6. Sync the code with Github.com
Commit and syncing,  I do find a bit confusing: Commit is saving the code in your project and syncing is syncing the commited code with Github.com. Let's keep that in mind.


Working with Github

Now if you create a repository a folder is created. this one is for the course Reproducible research R on Coursera.


Opening github desktop will show the files and code in the github folder on your local system.


Nothing is in the github.com repository, yet


Next step is syncing the code with Github.com


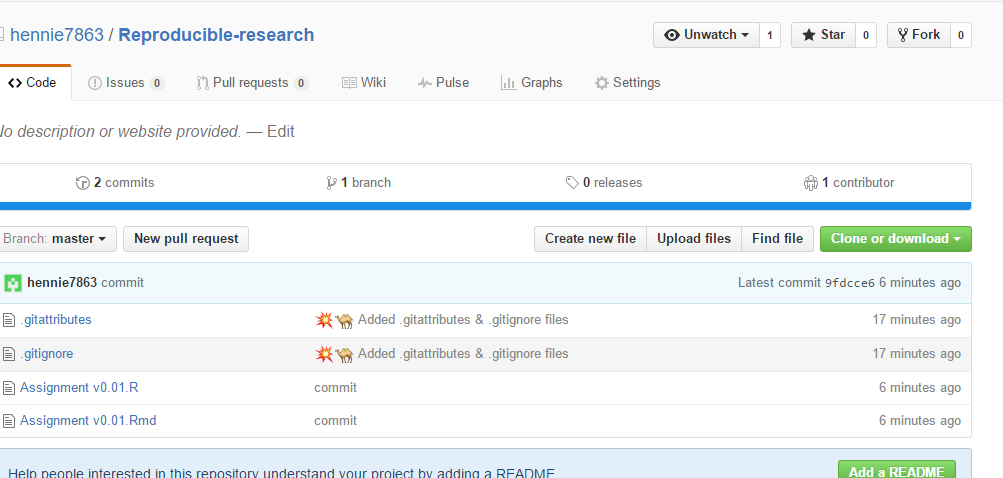
And the files are synced with Github.com


Conclusion

A small blogpost about using Github with Github desktop.

Greetz,
Hennie