zondag 29 april 2012

Creating a SQL Server 2012 playground (part I)

Introduction

Finally, I've recieved my new 64bits laptop from Dell and the first thing I want to do is to install SQL Server 2012, Sharepoint, MDS, DQS, SSDT, Powerview, Powerpivot, etc etc on a virtual machine. This blogpost is the first in a series of blogposts about installing SQL Server 2012 on a VM. This blogpost is (specifically) about downloading/installing VirtualBox and installing Windows Server 2008 R2 on the Virtual Box VM. For this article i've used the following blogs as an inspiration:
I have to apologize for the dutch  descriptions in some of the windows.


This blogpost is one in a series of blogposts:
  • Creating a VM environment with virtualbox (part I).
  • Configuration of the domain controller (part II).
  • Creating AD users and installing SQL Server 2012 (part III).
  • Installation of Sharepoint (part IV).
  • Adding the tabular mode instance to the SQL Server installation (part V).
  • Adding the powerpivot mode instance to the SQL Server installation (part VI).
  • Configuring SharePoint Central Administration (part VII).
  • Installing Reporting Services Sharepoint mode as Single Server Farm (part VIII).
  • Installing MS SQL Server Powerpivot for Excel 2010 (part IX).
  • Installation of SSDT and the SSDT Power tools (part X).
  • Installation of Contoso and AdventureWorks databases (part XI).
  • Installation of Master Data Services (part XII).
  • Installation of Data Quality Services (part XIII).
  • etc.


Prerequisites

For installing Windows Server 2008 R2 on a virtual Box you need the following software:
For further installation of SQL Server 2012 you need more software, offcourse. This is described in future blogposts.

Installing virtual Box and create a VM

In the last few years i've been using VMWARE workstation and VMWARE player to create a playground on my laptop that allowed me to investigate SQL Server features. I've decided to rebuild my virtual environment completely to extend my knowledge a bit further about installing SQL Server and the other new features. I'll be using Virtualbox because VirtualPC doesn't support 64bit(?) and I wanted to try something else than VMware. Installing virtualbox is straightforward process and is very easy to do.


When virtualbox is installed, I'll begin creating an environment as a base for other (new) environments. Now I can reuse the VM for new to be created environments. To get started I'll create a new environment by clicking on new in the virtual box window.


For my template, I chose to allocate 2048MB RAM and create a virtual hard disk that is 30GB in size, using the Windows Server 2008 x64 template for the VM. 


And define the harddisk as dynamically allocated:


Once the VM is created, edit the VMs settings to configure the additional networking. As suggested by the article of Jonathan I define the following network adapters:
  • Adapter 1 : I leave NAT enabled for Adapter 1. 
  • Adapter 2 : I configure internal networking for Adapter 2 and call it Domain network.
  • Adapter 3 and 4 : Define internal network and name it iSCSI network.


I don't think I need them all for my initial setup but perhaps in the future they could be useful.

Installing Windows Server 2008 R2

Once the VM boots it will immediately install Windows Server 2008 because the iso is selected with the virtual DVD drive during setup of the VM.


Then the installation process starts up and it will install the files.


In order to make it possible to copy text between the quest operating system to the virtualbox, the installation of guest edition is needed.


This is handy when the activation key is needed ;-) Jonathan talks about installing the following components :.NET Framework 3.5.1, Failover Clustering, and Multipath I/O to Windows Server 2008. I decide not to do this because there seems some issues with the Failover clustering and sysprep. And, it's not needed for a BI VM environement. So the next step is sysprep and this can be found here : c:\Windows\System32\Sysprep\sysprep.exe


With the "Enter System Out-of-Box Experience (OOBE)" you'll seal the image with the standard mode. With Generalize, all specific information like the SID is removed from the image. And now it's ready to create images. The next thing that useful to to do is:

  • Run Windows update.
  • Disable IE ESC.
  • Remote desktop enabled for administrator.
  • Disable expiration for administrator passwords
  • Turn off windows login/logoff sounds
  • Update folder options to show all files and extensions
  • Add desktop icons for Computer, User files and Recycle bin

And run SHUTDOWN....

Conclusion

This is my first experience with Virtualbox and Virtualbox seems an OK tool to me. In the next blogposts about creating a playground I'll go deeper into installing SQL Server 2012 and the related features.

Greetz,
Hennie

dinsdag 17 april 2012

IN, EXISTS, ANY, SOME and ALL subquery operators

Introduction

We usually use IN, EXISTS or JOINs when we want to combine a resultset with another with a subquery. Most of the time it works. But there are some operators that could become handy when you're building queries. These are ANY and ALL. SOME is also mentioned on MSDN but that is because of ANSI compatibility.

When a scalar value has to be compared with a single-column set of values, we usually use IN or JOINs. In addition to that, we can extend the comparison by using ANY and ALL operators which have rarely been used. These two operators work differently, understanding them would avoiding complexity of queries.

Preparation

I've borrowed an example from Dinesh blog for studying the IN, EXISTS, ANY(SOME) and ALL. Below you can see the script I've used for studying and demonstrating the different operators.

USE INEXISTSANYSOMEALL
GO

--Preparation scripts
DROP TABLE Table1
GO

DROP TABLE Table2
GO

CREATE TABLE Table1 (ID int)   
GO
CREATE TABLE Table2 (ID int)  
GO

TRUNCATE TABLE Table1
GO
  
INSERT INTO Table1 (ID)  
VALUES (1), (2), (3), (4), (5)   
GO

TRUNCATE TABLE Table2
GO

INSERT INTO Table2  (ID) 
VALUES (1), (3), (5) 


SELECT * FROM Table1

SELECT * FROM Table2

Resulting in


IN

The IN operator allows you to specify multiple values in a WHERE clause. For instance you could use the IN operator in the following SQL Syntax: WHERE column_name IN (value1,value2,...). But, it's also possible to use a subquery or a correlated subquery with an IN operator. Let's take a look at the following example:

Example:


SELECT ID FROM Table1  
WHERE ID IN (SELECT ID FROM Table2) 

Resulting in


Because of:

     (Table1:Id1 = Table2:Id1) ok
 OR (Table1:Id1 = Table2:Id3)
 OR (Table1:Id1 = Table2:Id5)
 OR (Table1:Id2 = Table2:Id1)
 OR (Table1:Id2 = Table2:Id3)
 OR (Table1:Id2 = Table2:Id5)
 OR (Table1:Id3 = Table2:Id1)
 OR (Table1:Id3 = Table2:Id3) ok
 OR (Table1:Id3 = Table2:Id5)
 OR (Table1:Id4 = Table2:Id1)
 OR (Table1:Id4 = Table2:Id3)
 OR (Table1:Id4 = Table2:Id5)
 OR (Table1:Id5 = Table2:Id1)
 OR (Table1:Id5 = Table2:Id3)
 OR (Table1:Id5 = Table2:Id5) ok

and a NOT IN example:

SELECT ID FROM Table1  
WHERE ID NOT IN (SELECT ID FROM Table2)   

Resulting in


Because of:

         ((Table1:Id1 <> Table2:Id1)        =
AND (Table1:Id1 <> Table2:Id3)
AND (Table1:Id1 <> Table2:Id5))
OR
          ((Table1:Id2 <> Table2:Id1)
AND  (Table1:Id2  <>  Table2:Id3)
AND  (Table1:Id2  <>  Table2:Id5))     ok
OR
           ((Table1:Id3  <>  Table2:Id1)
 AND (Table1:Id3  <>  Table2:Id3) =
 AND (Table1:Id3  <>  Table2:Id5))
 OR
           ((Table1:Id4 <> Table2:Id1)
 AND (Table1:Id4  <>  Table2:Id3)
 AND (Table1:Id4  <>  Table2:Id5))     ok
 OR
           ((Table1:Id5  <>  Table2:Id1)
 AND (Table1:Id5  <>  Table2:Id3)
 AND (Table1:Id5  <>  Table2:Id5))     =

EXISTS

The EXISTS condition is useful when the subquery returns at least one row. You can use the exist together with a correlated query, like the example below:

 SELECT ID FROM Table1   
 WHERE EXISTS (SELECT ID FROM Table2 WHERE Table1.id > Table2.id)

Resulting in:


Because of :

 (Table1:Id1 > Table2:Id1)    
 OR (Table1:Id1 > Table2:Id3)
 OR (Table1:Id1 > Table2:Id5)
 OR (Table1:Id2 > Table2:Id1)   ok
 OR (Table1:Id2 > Table2:Id3)
 OR (Table1:Id2 > Table2:Id5)
 OR (Table1:Id3 > Table2:Id1)   ok
 OR (Table1:Id3 > Table2:Id3)
 OR (Table1:Id3 > Table2:Id5)
 OR (Table1:Id4 > Table2:Id1)   ok
 OR (Table1:Id4 > Table2:Id3)   ok
 OR (Table1:Id4 > Table2:Id5)
 OR (Table1:Id5 > Table2:Id1)   ok
 OR (Table1:Id5 > Table2:Id3)   ok
 OR (Table1:Id5 > Table2:Id5)


ANY (SOME)

ANY operator returns true when the scalar value matches with any value in the single-column set of values.  The comparison can be extended with <, >, and <> operators too. You should notice that =ANY is equal to IN. But the opposite of it, <>ANY and NOT IN are NOT equal. Remember, the equal operator for NOT IN is, <>ALL. >ANY means greater than at least one value, that is, greater than the minimum. So >ANY (1, 3, 5) means greater than 1.

Example :

       
SELECT ID FROM Table1   
WHERE ID = ANY (SELECT ID FROM Table2)  
       

Resulting in


Because of:

        (Table1:Id1 = Table2:Id1) ok
 OR (Table1:Id1 = Table2:Id3)
 OR (Table1:Id1 = Table2:Id5)
 OR (Table1:Id2 = Table2:Id1)
 OR (Table1:Id2 = Table2:Id3)
 OR (Table1:Id2 = Table2:Id5)
 OR (Table1:Id3 = Table2:Id1)
 OR (Table1:Id3 = Table2:Id3) ok
 OR (Table1:Id3 = Table2:Id5)
 OR (Table1:Id4 = Table2:Id1)
 OR (Table1:Id4 = Table2:Id3)
 OR (Table1:Id4 = Table2:Id5)
 OR (Table1:Id5 = Table2:Id1)
 OR (Table1:Id5 = Table2:Id3)
 OR (Table1:Id5 = Table2:Id5) ok

Example:

SELECT ID FROM Table1   
WHERE ID <>  ANY (SELECT ID FROM Table2) 

Resulting in:


Because of:

  NOT  (Table1:Id1 = Table2:Id1)
 OR (Table1:Id1 = Table2:Id3)   ok
 OR (Table1:Id1 = Table2:Id5)   ok
 OR (Table1:Id2 = Table2:Id1)   ok
 OR (Table1:Id2 = Table2:Id3)   ok
 OR (Table1:Id2 = Table2:Id5)   ok
 OR (Table1:Id3 = Table2:Id1)   ok
 OR (Table1:Id3 = Table2:Id3)
 OR (Table1:Id3 = Table2:Id5)   ok
 OR (Table1:Id4 = Table2:Id1)   ok
 OR (Table1:Id4 = Table2:Id3)   ok
 OR (Table1:Id4 = Table2:Id5)   ok
 OR (Table1:Id5 = Table2:Id1)   ok
 OR (Table1:Id5 = Table2:Id3)   ok
 OR (Table1:Id5 = Table2:Id5)

Example :


SELECT ID FROM Table1   
WHERE ID > ANY (SELECT ID FROM Table2)   

Resulting in :


Because of:

 (Table1:Id1 > Table2:Id1)    
 OR (Table1:Id1 > Table2:Id3)
 OR (Table1:Id1 > Table2:Id5)
 OR (Table1:Id2 > Table2:Id1)   ok
 OR (Table1:Id2 > Table2:Id3)
 OR (Table1:Id2 > Table2:Id5)
 OR (Table1:Id3 > Table2:Id1)   ok
 OR (Table1:Id3 > Table2:Id3)
 OR (Table1:Id3 > Table2:Id5)
 OR (Table1:Id4 > Table2:Id1)   ok
 OR (Table1:Id4 > Table2:Id3)   ok
 OR (Table1:Id4 > Table2:Id5)
 OR (Table1:Id5 > Table2:Id1)   ok
 OR (Table1:Id5 > Table2:Id3)   ok
 OR (Table1:Id5 > Table2:Id5)

ALL

ALL operator returns true when the scalar value (of the outer query) matches with all value in the single-column set of values. The comparison can be extended with <, >, and <> operators too. For instance, using the > comparison operator, >ALL means greater than every value. In other words, it means greater than the maximum value. For example, >=ALL (1, 3, 5) means greater than or egual to 5. Let's take a look at the following example.

Example:

SELECT Id FROM Table1   
WHERE Id >= ALL (SELECT Id FROM Table2)      

Resulting in:


And this is because:

          ((Table1:Id1 >= Table2:Id1)  
AND (Table1:Id1 >= Table2:Id3)
AND (Table1:Id1 >= Table2:Id5))
OR
            ((Table1:Id2 >= Table2:Id1)
AND   (Table1:Id2 >= Table2:Id3)
AND   (Table1:Id2 >= Table2:Id5))
OR
           ((Table1:Id3 >= Table2:Id1)
 AND (Table1:Id3 >= Table2:Id3)
 AND (Table1:Id3 >= Table2:Id5))
 OR
           ((Table1:Id4 >=Table2:Id1)
 AND (Table1:Id4 >= Table2:Id3)
 AND (Table1:Id4 >= Table2:Id5))
 OR
          ( (Table1:Id5 >= Table2:Id1)
 AND (Table1:Id5 >= Table2:Id3)
 AND (Table1:Id5 >= Table2:Id5)) ok

Conclusion

I was studying for the exam 70-461 and i ran into these operators and it seems that i haven't noticed them earlier (or i've forgotten them). These seems very handy in case of values ' bigger than' or 'lesser than' in correlated queries. In these cases the syntax is more simplified. There are a couple of examples on the internet for better understanding.

Greetz,
Hennie

woensdag 11 april 2012

New built-in functions SQL Server 2012

Introduction

SQL Server 2012 introduces 14 new built-in functions. These functions ease the path of migration for database developers enabling them creating applications. However these functions will also be useful to experienced users of SQL Server.

These are:
  • Conversion functions
    • PARSE()
    • TRY_CONVERT()
    • TRY_PARSE ()
  • Date and time functions
    • DATEFROMPARTS()
    • DATETIME2FROMPARTS()
    • DATETIMEFROMPARTS()
    • DATETIMEOFFSETFROMPARTS()
    • EOMONTH()
    • SMALLDATETIMEFROMPARTS()
    • TIMEFROMPARTS()
  • Logical functions
    • CHOOSE()
    • IIF()
  • String functions
    • CONCAT()
    • FORMAT() 

Conversion functions

PARSE()
The PARSE function can be used to convert any string value to a Numeric or to a Date and Time format. It's also possible to convert to a specific Country datetime format.

       
 SELECT PARSE('31/03/2012' AS datetime USING 'nl-NL') 
 

Resulting in :


TRY_CONVERT ()
The TRY_CONVERT function converts the pased value to a specified data type. If the conversion is successful then it will return the value as a specified data type. Otherwise it will return a NULL value. 

       
SELECT TRY_CONVERT(int,'text');
SELECT TRY_CONVERT(Varchar(10),'text');
SELECT TRY_CONVERT(xml,'<test>Hello</test>');
SELECT TRY_CONVERT(xml,'<test>Hello<test>');
 
Resulting in :


TRY_PARSE()
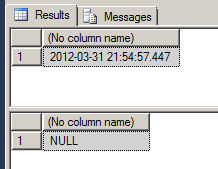
The TRY_PARSE function in SQL Server 2012 can be used to convert any string value to a Numeric or to a Date and Time. 
SELECT TRY_PARSE('2012-03-31 21:54:57.447' AS datetime) 
SELECT TRY_PARSE('asda' AS int) 
  
Resulting in :


Date and time functions

DATEFROMPARTS()
DATEFROMPARTS returns a date value with the date portion set to the specified year, month and day, and the time portion set to the default. If the arguments are not valid, then an error is raised. If required arguments are null, then null is returned.

       
SELECT DATEFROMPARTS (2012, 03, 31)
SELECT DATEFROMPARTS (2012, 03, 32)
       

Resulting in


and

Msg 289, Level 16, State 1, Line 2 Cannot construct data type date, some of the arguments have values which are not valid.

DATETIME2FROMPARTS()
Returns a datetime2 value for the specified date and time and with the specified precision

       
 SELECT DATETIME2FROMPARTS (2012, 03, 31, 16, 56, 00, 00, 00)
 

resulting in


DATETIMEFROMPARTS() This function determines a datevalue for the specified date and time.

       
 SELECT DATETIME2FROMPARTS (2012, 03, 31, 16, 56, 00, 00, 00)


resulting in :


DATETIMEOFFSETFROMPARTS()
Returns adatetimeoffset value for the specified date and time and with the specified offsets and precision.

       
SELECT DATETIMEOFFSETFROMPARTS (2012, 03, 31, 1, 12, 00, 00, 05, 30, 00)


resulting in


EOMONTH()
Returns the last day of the month that contains the specified date, with an optional offset.

       
 SELECT EOMONTH(getdate())


Resulting in


SMALLDATETIMEFROMPARTS()
Return a smalldatetime value for the specified date and time.


SELECT DATETIMEFROMPARTS (2012, 03, 31, 12, 13, 00, 00)


resulting in


TIMEFROMPARTS()
Returns a time value for the specified time and with the specified precision.


SELECT DATETIMEFROMPARTS (2012, 03, 31, 12, 13, 00, 00)  
 

resulting in


Logical functions

CHOOSE()
This function is very simple and it returns specified index from a list of values. If Index is numeric, it is converted to integer. On the other hand, if index is greater than the element in the list, it returns NULL.

       
SELECT CHOOSE(2, 'Dog', 'Cat', 'etc')


resulting in :


IIF()
IIF stands for Inline IF. IIF functions is very similar to CASE function, however you can only evaluate the expression for two values and no more.


SELECT IIF (2>1, 'TRUE', 'FALSE') 
SELECT IIF (2>1 OR NOT 1>2, 'TRUE', 'FALSE')  


resulting in


String functions

CONCAT()
The output is a string, as the result of the concatenation of two or more strings – if the input is another type than string a conversion will be done implicit.

       
SELECT CONCAT ('Today', ' it is ', getdate())


Resulting in:


FORMAT() 
The function FORMAT() accepts 3 parameters. The first parameter is the VALUE parameter where you pass the date value or numeric value. The second parameter is the.NET Framework format string. The format parameter is case sensitive. "D" doesn’t mean the same as "d".  The third parameter is the culture. This can be any culture supported by the .NET Framework.

       
SELECT FORMAT(GETDATE(), 'dd-MM-yy') 
 

resulting in

Conclusion

This blogpost is an overview of the new built-in functions of SQL SERVER 2012. My background is BI and datawarehousing and some functions are useful but it seems that the new built-in functions are more suitable for website and application support.

Greetz
Hennie

woensdag 4 april 2012

My first SQLAzure database!

Introduction

At Microsoft Virtual Academy you can take all kind of courses about Microsoft products. I've decided to follow the course about SQL Azure. There are all kind of articles about SQL Azure included and a lot of videos about SQL Azure. These are very informative. If you want to know more about SQL Azure I can recommend you following these courses.

In this blogpost I'll descibe a first exploration of SQL Azure. First I'll describe the registration process, then creating my first SQL Azure database and finally connecting with the database with SQL Server Management Studio.


Registration

First, registration for SQL Azure is needed at the windows Azure portal. You can register for windowsazure at the windows azure site and press select "buy" . The screens below are in the dutch language. Apologizes for that.


Press Next.


Login in with your windows live account


Then, a code verification is needed. A text message is send to your cell phone.


Enter your creditcard information and you're in.


My first SQL Azure database

This paragraph is about creating a simple SQL Azure database. The screen below is a maintenance window of the windows azure platform. Click on 'Database' for creating the SQL Azure database.


But, first we need to create a new server:


Enter an administrator login for the server


Enter the IP address.


And now it's really time to create a database in Azure.


The following window shows the database information.


The database is created now and I can test the database with the test connectivity option.


And enter your account.


Connect with Management Studio

In this pragraph I'll describe creating the database.First login to SQL Azure


And enter the web enables database objects editor.


Below, i'm creating my first table with SQL Azure!!


Now startup SQL Server Management studio and try to connect to the SQLAzure server:


At first i couldn't connect to the SQLAzure database. The following message kept on coming:


TITLE: Connect to Server
------------------------------


Cannot connect to xxxxxxxxx.database.windows.net.


------------------------------
ADDITIONAL INFORMATION:


Login failed for user 'xxxxxxx'.
This session has been assigned a tracing ID of '1xxxxxxd-155xxxxx8-afcd-d1ffeefb5d90'.  Provide this tracing ID to customer support when you need assistance. (Microsoft SQL Server, Error: 18456)


For help, click: http://go.microsoft.com/fwlink?ProdName=Microsoft%20SQL%20Server&EvtSrc=MSSQLServer&EvtID=18456&LinkId=20476

I tried a lot of things as suggested on many sites. Nothing seemed to work. But, when I opened a query to a on premise database and  then changed the connection to the SQLAzure FQDN, it worked!!!


And now connecting with the connect button works too.


And let's check the results of the insert script in the SQL Azure portal


Conclusion
It's very easy to create a database in SQL Azure. I can't say much for now about SQL Azure. I had some troubles connecting with the SQL Azure server but after some trails it seems to be working now.

Greetz,
Hennie