zaterdag 27 oktober 2012

BIML : Generating Tasks Dynamically (part IV)


Introduction 

This is already the fourth post in row about BIML. In this particular post the generation of tasks with BIML is examined. The former posts (part I, part II and part III) were about generating the packages with the xml notation of BIML. In this blogpost C# is used for generating packages. If you are familiar with ASP or ASP.net then you may know that it's possible to generate HTML with dynamic VB or C# code. And that is exactly how you can use BIML. If you add a <#@ template language="C#" #> and <# #> or <#= #>  you integrate coding in your BIML script.

Generating Tasks Dynamically

In the example below 5 ExecuteSQL Tasks are generated from the coding. In this example I've build a loop with the for statement that starts at 1 and is looped until 5 is reached.

<#@ template language="C#" #>
<Biml xmlns="http://schemas.varigence.com/biml.xsd">
<Annotations>
  <Annotation AnnotationType ="Tag">
    File: xxxxx.biml
    using BIML from the 1.6.1 BIDS Helper
    BIML: 1.6.1 VS2008 BIDS Helper
    (c)Hennie de Nooijer
  </Annotation>
</Annotations>
<Connections>
  <Connection Name ="CnOleDBAdventureWorksLT2008" ConnectionString="Data Source=.;
  InitialCatalog=AdventureWorksLT2008; Integrated Security=SSPI;Provider=SQLNCLI10"/>
</Connections>
<Packages>
  <Package Name="Basic" ConstraintMode="Linear">
    <Tasks>
    <# int i; for (i=1; i<=5; ++i){ #>
      <ExecuteSQL Name="ExecuteSQLTask<#=i#>" ConnectionName=
              "CnOleDBAdventureWorksLT2008" ResultSet="None">
        <DirectInput>SELECT * FROM SalesLT.Product</DirectInput>
      </ExecuteSQL>
    <# } #>
    </Tasks>
  </Package>
</Packages>
</Biml>

This piece of coding results in 5 ExecuteSQL Tasks:


Conclusion

Now things are getting interesting; generation of packages from metadata. That is very useful building ETL packages.

Greetz,
Hennie


maandag 22 oktober 2012

SSIS : Experimenting with BIML (part III)

Introduction

The third blogpost about BIML again and in this blogpost there are three examples given that can aid you building BIML scripts. I do find them useful for developing BIML Scripts.

  1.  Build package with two tasks (lineair).
  2.  Build package with two tasks (Parallel).
  3.  Experimenting with annotation.

The BIML script that is used for this blogpost is from the BIDSHelper 1.6.1.


1. Build package with two tasks (lineair)

In this step We're going to create a package with two tasks (ExecuteSQLTask1 and ExecuteSQLTask2) and these tasks are lineair executed meaning that ExecuteSQL1 is executed before ExecuteSQLTask2 is executed.

<Biml xmlns="http://schemas.varigence.com/biml.xsd">
<Connections>
<Connection Name ="CnOleDBAdventureWorksLT2008" ConnectionString="Data Source=.;Initial 
          Catalog=AdventureWorksLT2008; Integrated Security=SSPI;Provider=SQLNCLI10"/>
<Connection Name ="CnOleDBAdventureWorks2008" ConnectionString="Data Source=.;Initial 
          Catalog=AdventureWorks2008;Integrated Security=SSPI;Provider=SQLNCLI10"/>
</Connections>
<Packages>
  <Package Name="Basic" ConstraintMode="Linear">
    <Tasks>
      <ExecuteSQL Name="ExecuteSQLTask1" ConnectionName="CnOleDBAdventureWorksLT2008" 
                   ResultSet="None">
        <DirectInput>SELECT * FROM SalesLT.Product</DirectInput>
      </ExecuteSQL>
      <ExecuteSQL Name="ExecuteSQLTask2" ConnectionName="CnOleDBAdventureWorks2008" 
                   ResultSet="None">
        <DirectInput>SELECT * FROM Sales.Product</DirectInput>
      </ExecuteSQL>
    </Tasks>
  </Package>
</Packages>
</Biml>

This BIML script results in the following package:


2. Build package with two tasks (Parallel)

In the former step We've executed the task in liniear mode but in this step We'll execute them in parallel. In this step we're going to create a package with two tasks (ExecuteSQLTask1 and ExecuteSQLTask2) and these tasks are parallel executed meaning that ExecuteSQL1 is independently executed from ExecuteSQLTask2.

<Biml xmlns="http://schemas.varigence.com/biml.xsd">
<Connections>
<Connection Name ="CnOleDBAdventureWorksLT2008" ConnectionString="Data Source=.;Initial 
     Catalog=AdventureWorksLT2008; Integrated Security=SSPI;Provider=SQLNCLI10"/>
<Connection Name ="CnOleDBAdventureWorks2008" ConnectionString="Data Source=.;Initial 
     Catalog=AdventureWorks2008;Integrated Security=SSPI;Provider=SQLNCLI10"/>
</Connections>
<Packages>
  <Package Name="Basic" ConstraintMode="parallel">
    <Tasks>
      <ExecuteSQL Name="ExecuteSQLTask1" ConnectionName="CnOleDBAdventureWorksLT2008" 
                   ResultSet="None">
        <DirectInput>SELECT * FROM SalesLT.Product</DirectInput>
      </ExecuteSQL>
      <ExecuteSQL Name="ExecuteSQLTask2" ConnectionName="CnOleDBAdventureWorks2008" 
                   ResultSet="None">
        <DirectInput>SELECT * FROM Sales.Product</DirectInput>
      </ExecuteSQL>
    </Tasks>
  </Package>
</Packages>
</Biml>

This BIML script results in the following package:


3. Experimenting with annotation

I was wondering whether I could add some annotation to the SSIS package with BIML script. As you may know there is also an option in the contextmenu of the package, add annotation. So my initial assumption was that I could add an annotation child element to the package element and a annotation is shown in the SSIS package. That would be neat but I can't get it right (at this moment). With the annotationtype you can direct the annotation to some properties of a element, for instance Description of a package, like I  do in the example shown below. That works as you see in the screendump of the Description property of a package but I want to show it on the SSIS package Pane. Let me know if you know how.

<Biml xmlns="http://schemas.varigence.com/biml.xsd">
<Annotations>
 <Annotation AnnotationType ="Tag">
  File: Basic.biml
  Demo biml file on how to create tables
  using BIML from the 1.6.1 BIDS Helper
  Enviroment:
  DB: 
  BIML: 1.6.1 VS2008 BIDS Helper
  (c)Hennie de Nooijer
 </Annotation>
</Annotations>
<Connections>
<Connection Name ="CnOleDBAdventureWorksLT2008" ConnectionString="Data Source=.;Initial 
        Catalog=AdventureWorksLT2008;Integrated Security=SSPI;Provider=SQLNCLI10"/>
</Connections>
<Packages>
 <Package Name="Basic" ConstraintMode="Linear">
  <Annotations>
   <Annotation AnnotationType ="Description">
    File: Basic.biml
    Demo biml file on how to create tables
    using BIML from the 1.6.1 BIDS Helper
    Enviroment:
    DB: 
    BIML: 1.6.1 VS2008 BIDS Helper
    (c)Hennie de Nooijer
   </Annotation>
  </Annotations>
  <Tasks>
   <ExecuteSQL Name="ExecuteSQLTask1" 
       ConnectionName="CnOleDBAdventureWorksLT2008" ResultSet="None">
    <DirectInput>
     SELECT * FROM SalesLT.Product
    </DirectInput>
   </ExecuteSQL>
  </Tasks>
 </Package>
</Packages>
</Biml>     

And now a description is show at the description attribute of the package:


Conclusion

Still a lot to learn about BIML Script but so far I'm impressed with the power of BIMLScript.

Greetz,
Hennie

vrijdag 19 oktober 2012

SSIS : Experimenting with BIML (Part II)

Introduction

This is a blogpost about BIML, written in a serie of more blogposts. In these blogpost I'll discover the possibillities of BIML and how to generate SSIS packages. I've already posted a blogpost about BIML and this is the second blogpost about BIML. In this blogpost three examples of BIML script and the result of the generation of SSIS packages is shown:
  1. Build a simple package with BIMLscript
  2. Build a multiple packages with BIMLscript
  3. Build package with a database connection and a task
The BIML script that is used for this blogpost is from the BIDSHelper 1.6.1.

1. Build a simple package with BIMLscript

In this first step we will start with building a simple package with BIML Script. Initially the BIML script starts with two lines of code: <Biml> and </Biml>. In order to create a package you need to add the lines <Packages> <Package></Package></Packages> to the BIML Script. There is an extra attribute needed at the Package element. The ConstraintMode property is part of packages and containers. This property controls how precedence constraints are generated in the control flow. If you want all tasks to be run in sequence, you can set the ConstraintMode to Linear. It seems that this element is mandatory.

<Biml xmlns="http://schemas.varigence.com/biml.xsd">
 <Packages>
  <Package Name="Basic" ConstraintMode="Linear">
  </Package>
 </Packages>
</Biml>

2. Build multiple packages with BIMLscript

In this step we are going to build multiple packages with a single BIML script. As you may already know the <Packages> element suggest that you can create multiple packages with a BIMLScript. Let's try this with the following code:

<Biml xmlns="http://schemas.varigence.com/biml.xsd">
<Packages>
 <Package Name="Basic1"  ConstraintMode="Linear"></Package>
 <Package Name="Basic2"  ConstraintMode="Parallel"></Package>
 <Package Name="Basic3"  ConstraintMode="Linear"></Package>
</Packages>
</Biml>

And, yes this piece of code generates three packages in the BIDS project. There are now three packages named Basic1, Basic2 and Basic3.


3. Build package with a database connection and a task

In this step we are going to create a simple package with a connection. I've tried multiple coding but I can't get it working without adding a task. Let me know if you do find a shorter solution. In this case I've added a <connections> element, a <Tasks> element, an ExecuteSQL element and a <DirectInput> element.  

<Biml xmlns="http://schemas.varigence.com/biml.xsd">
<Connections>
 <Connection Name ="CnOleDBAdventureWorks2008" ConnectionString="Data Source=.                ;Initial Catalog=AdventureWorksLT2008;Integrated Security=SSPI;Provider=SQLNCLI10"/>
</Connections>
<Packages>
 <Package Name="Basic" ConstraintMode="Linear">
  <Tasks>
   <ExecuteSQL Name="ExecuteSQLTask1" ConnectionName="CnOleDBAdventureWorks2008" 
              ResultSet="None">
    <DirectInput>
  SELECT * FROM SalesLT.Product
    </DirectInput>
   </ExecuteSQL>
  </Tasks>
 </Package>
</Packages>
</Biml>

This results is shown in the following screenshot:


Conclusion

This is really a powerful scripting language that can really help to automate generating packages. What a difference with the API of SSIS!!

Greetz,
Hennie

zaterdag 13 oktober 2012

SSIS : My first BIML package (part I)

Introduction

In this blogpost I'll show how to create a simple package using BIML and the BIML Package Generator Feature in BIDS helper. I assume that you already installed BIDSHelper form Codeplex. The next thing to do is creating a new project in in BIDS and start using the BIML Package Generator Feature from BIDSHelper. I've borrowed the code from the tutorials of BIDSHelper.

The BIML script that is used for this blogpost is from the BIDSHelper 1.6.1

Creating a simple BIML package

Click "Add New BIML File" and a new file is added to the miscellaneous folder in the solution called BimlScript.biml. This name is automatically generated and you can change this to another name. Right click on the filename and rename file to MyFirstBIMLPackage. 


Double clicking on the file will open the BIML editor. The first lines are already written for you. 


The first thing we have to do is creating a connection to a database. This is done in the first section of the package. The next section defines a single package that contains a dataflowtask and the dataflow task contains  two components: OLEDBSource and a Multicast.


The next step is to generate a package with this definition. Right click on the BIML file and Generate SSIS Packages from the contextmenu. A new SSIS package appears in the Packages list. 


If you view the generated package then you'll see the following package components.


Conclusion

BIML is a very intersting feature of BIDSHelper. I've tried in earlier blogsposts to create a SSIS package with the SSIS API but that is a very timeconsuming and erroneous process. I think that with the BIML support in BIDSHelper you can generate SSIS package a lot quicker.

Greetz,
Hennie

donderdag 4 oktober 2012

The Future Group TFG Innovation event

Thursday 1st of November The Future Group organizes the TFG Innovation event at the Amsterdam office of IBM. During this event several speakers gives a presentation about groundbreaking technologies. My specialliy interest goes to the presentation of Martijn Evers: ‘Data Vault: De moderne aanpak voor het realiseren van een centrale “Datapakkluis”’ ('Data Vault: modern approach for implementing a central "Data warevault"').  But others are interesting too.


This is a free event that is being organized by The Future Group. It starts at 18.00 hrs and has several sessions on subjects like BI, analytics, architecture and software development. So if you’re interested, don’t hesitate to register.

I hope to see you at the event!

Greetz
Hennie

zaterdag 22 september 2012

SQL Server Data Tools (SSDT) (Part II)

Introduction

I've a situation where I've an environment with SQL Server 2008 R2 and in this blog I'll describe whether or not I can use the SSDT together with SQL Server 2008 R2. This the second time I've blogged about SSDT.You can find the first blog here. I've used the following references for this blogpost:

Usage of SSDT

SQL Server Data Tools (SSDT) is an impressive toolset, we were waiting for a long time. The solution explorer in SSMS is a terrible add-on to SQL Server. So I'm very happy Microsoft came up with a real developer tool for a developer. Initially it's build for SQL Azure but is now available for SQL Server 2000, 2005, 2008, 2008 R2 and SQL Server 2012. This is great. Now there is an integrated environment for database developers to carry out all of their database design but also SSAS, SSIS and SSRS developments.

Installation

First I've created a new VirtualBox environment for this trail. The next thing is the installation of SQL Server 2008 R2. In the september 2012 update there are two versions of SSDT: VS2010 and VS2012. I've downloaded SSDT 2012 and the Powertools. Let's see what happens when we install the software. In the september 2012 update there are two versions of SSDT: VS2010 and VS2012.

The first time I tried to install SSDT 2012 some errors occured. Below a snippet of the error log file.

[04EC:08BC][2012-09-19T05:42:28]: Registry key not found. Key = 'SOFTWARE\Microsoft\DevDiv\vs\Servicing\11.0\devenv'
[04EC:08BC][2012-09-19T05:42:28]: Registry key not found. Key = 'SOFTWARE\Microsoft\DevDiv\vs\Servicing\11.0\devenv\1033'
[04EC:08BC][2012-09-19T05:42:28]: Registry key not found. Key = 'SOFTWARE\Microsoft\DevDiv\VS\Servicing\11.0\intshelladditionalres\1033'
[04EC:08BC][2012-09-19T05:42:28]: Registry key not found. Key = 'SOFTWARE\Microsoft\DevDiv\VS\Servicing\11.0\IsoShell'

This error happend because I didn't had an internet connection and the installer wanted to download Microsoft .NET Framework 4.5 and some more software. From the the MSDN pages I found the following explanation:

If you do not have Visual Studio 2012 Professional Edition or above, SSDT will install the Visual Studio 2012 Integrated Shell and install SSDT - September 2012 on top of it. The Integrated Shell will only contain SSDT, and does not include VS programming languages and the features that support their respective project systems. 

The following software is installed:
  • .NET framework 4.5.
  • Microsoft Visual studio 2012 Shelll (Isolated).
  • Microsoft Visual studio 2012 Shelll Language pack ENU.
  • Microsoft SQL Server 2012 Compiler Service.
  • Microsoft SQL Server 2012 Transact-SQL Compiler Script dom.
  • Microsoft SQL Server 2012 Data Tier app framework. 
  • Microsoft SQL Server 2012 Expres local DB.
  • Microsoft SQL Server 2012 Management objects (x64).
  • Microsoft SQL Server Data Tools (11.1.20905.0)

Here an example of a screenshot of the installation progress:


Then I installed the SQL Server Powertools on the VM box.


After the installation of SQL Server Data tools and SQL Server Data Tools Powertools I started the Visual Studio 2012. I've now the option to start a SQL Server Database Project.


Conclusion

As I've shown (partly) in this blogpost, it is possible to install SQL Server 2008 R2 and SQL Server Data Tools 2012 side by side.

zaterdag 15 september 2012

Using the TPC-H Benchmark

Introduction

Until this moment I've used the AdventureWorks database (delivered with SQL Server) for building SQL cases, testing some SQL code, proof of concepts, etc. Now, I'm currently working at a client who have millions of records in certain tables. I couldn't find a large table in the AdventureWorks database that contains millions of records. Initially, I was building some ETL scripts on small tables. These ETL scripts are being developed for loading SCD II dimensions. As said earlier, the client has huge tables, that would and should be modelled as dimensions. The Adventureworks database is a great database but I wanted a database that would represent my current client situation in a better way. I've asked Thomas Kejser if he knows a database example that could be used for my problem and he came up with the TPC-H database example. My friend Google, helped me finding more information about the TPC benchmarks. There a couple of bloggers and sites relevant for this post:

Take a look at them if you're interested in more information about TPC benchmarks. There are multiple benchmarks available like TPC-C, TPC-E and TPC-Energy.

TPC-H Benchmark

From the TPC website: "The TPC Benchmark™H (TPC-H) is a decision support benchmark. It consists of a suite of business oriented ad-hoc queries and concurrent data modifications. The queries and the data populating the database have been chosen to have broad industry-wide relevance. This benchmark illustrates decision support systems that examine large volumes of data, execute queries with a high degree of complexity, and give answers to critical business questions."

The TPC-H Benchmark can be used to examine large volumes of data, execute queries with a high degree of complexity and a supposed answer to critical business questions.

Installation

There seems to be a data file generation tool present on the TPC website. The following installation steps I've taken:
1. Download the ZIP file (version 2.14.3) or the tgz file  from the Official TPC site. The size of this zip file is about 25,7 MB.  I didn't manage to extract the zip file (unrecognized file format (with Windows zipper and Winzip) and therefore I unzipped the .tgz file.
2. The dataset is built using an application in C++. I opened the project files using Visual Studio 2012 Express, built them, and got a resulting dbgen.exe file.
3. In the debug folder the DBGEN.exe tool is present when the build is done.
4. The initial execution of the DBGEN.exe tool generated an error: "Open failed for dists.dss". I found the file (in map above) and copied this to the debug folder. I think that isn't a proper way to do this but it was a quick win;-).

Using the DBGEN tool

I ran the tool DBGEN.exe again and the following files were generated:
  • Customer.tbl
  • Lineitem.tbl
  • Nation.tbl
  • Orders.tbl
  • Part.tbl
  • Partsupp.tbl
  • Region.tbl
  • Supplier.tbl
On the site of Pilho Kim you'll find CREATE TABLE scripts of MySQL. I've used them as a base for my CREATE TABLE scripts:

       
USE [TPCD]
GO

IF  EXISTS (SELECT * FROM sys.objects WHERE object_id = OBJECT_ID(N'[dbo].[SUPPLIER]') AND type in (N'U'))
DROP TABLE [dbo].[SUPPLIER]
GO

IF  EXISTS (SELECT * FROM sys.objects WHERE object_id = OBJECT_ID(N'[dbo].[REGION]') AND type in (N'U'))
DROP TABLE [dbo].[REGION]
GO


IF  EXISTS (SELECT * FROM sys.objects WHERE object_id = OBJECT_ID(N'[dbo].[PARTSUPP]') AND type in (N'U'))
DROP TABLE [dbo].[PARTSUPP]
GO


IF  EXISTS (SELECT * FROM sys.objects WHERE object_id = OBJECT_ID(N'[dbo].[PART]') AND type in (N'U'))
DROP TABLE [dbo].[PART]
GO


IF  EXISTS (SELECT * FROM sys.objects WHERE object_id = OBJECT_ID(N'[dbo].[ORDERS]') AND type in (N'U'))
DROP TABLE [dbo].[ORDERS]
GO

IF  EXISTS (SELECT * FROM sys.objects WHERE object_id = OBJECT_ID(N'[dbo].[NATION]') AND type in (N'U'))
DROP TABLE [dbo].[NATION]
GO


IF  EXISTS (SELECT * FROM sys.objects WHERE object_id = OBJECT_ID(N'[dbo].[LINEITEM]') AND type in (N'U'))
DROP TABLE [dbo].[LINEITEM]
GO


IF  EXISTS (SELECT * FROM sys.objects WHERE object_id = OBJECT_ID(N'[dbo].[CUSTOMER]') AND type in (N'U'))
DROP TABLE [dbo].[CUSTOMER]
GO

IF NOT EXISTS (SELECT * FROM sys.objects WHERE object_id = OBJECT_ID(N'[dbo].[CUSTOMER]') AND type in (N'U'))
BEGIN
CREATE TABLE [dbo].[CUSTOMER](
 [C_CUSTKEY] [int] NOT NULL,
 [C_NAME] [varchar](25) NOT NULL,
 [C_ADDRESS] [varchar](40) NOT NULL,
 [C_NATIONKEY] [int] NOT NULL,
 [C_PHONE] [char](15) NOT NULL,
 [C_ACCTBAL] [decimal](15, 2) NOT NULL,
 [C_MKTSEGMENT] [char](10) NOT NULL,
 [C_COMMENT] [varchar](117) NOT NULL
) ON [PRIMARY]
END
GO

IF NOT EXISTS (SELECT * FROM sys.objects WHERE object_id = OBJECT_ID(N'[dbo].[LINEITEM]') AND type in (N'U'))
BEGIN
CREATE TABLE [dbo].[LINEITEM](
 [L_ORDERKEY] [int] NOT NULL,
 [L_PARTKEY] [int] NOT NULL,
 [L_SUPPKEY] [int] NOT NULL,
 [L_LINENUMBER] [int] NOT NULL,
 [L_QUANTITY] [decimal](15, 2) NOT NULL,
 [L_EXTENDEDPRICE] [decimal](15, 2) NOT NULL,
 [L_DISCOUNT] [decimal](15, 2) NOT NULL,
 [L_TAX] [decimal](15, 2) NOT NULL,
 [L_RETURNFLAG] [char](1) NOT NULL,
 [L_LINESTATUS] [char](1) NOT NULL,
 [L_SHIPDATE] [date] NOT NULL,
 [L_COMMITDATE] [date] NOT NULL,
 [L_RECEIPTDATE] [date] NOT NULL,
 [L_SHIPINSTRUCT] [char](25) NOT NULL,
 [L_SHIPMODE] [char](10) NOT NULL,
 [L_COMMENT] [varchar](44) NOT NULL
) ON [PRIMARY]
END
GO

IF NOT EXISTS (SELECT * FROM sys.objects WHERE object_id = OBJECT_ID(N'[dbo].[NATION]') AND type in (N'U'))
BEGIN
CREATE TABLE [dbo].[NATION](
 [N_NATIONKEY] [int] NOT NULL,
 [N_NAME] [char](25) NOT NULL,
 [N_REGIONKEY] [int] NOT NULL,
 [N_COMMENT] [varchar](152) NULL
) ON [PRIMARY]
END
GO

IF NOT EXISTS (SELECT * FROM sys.objects WHERE object_id = OBJECT_ID(N'[dbo].[ORDERS]') AND type in (N'U'))
BEGIN
CREATE TABLE [dbo].[ORDERS](
 [O_ORDERKEY] [int] NOT NULL,
 [O_CUSTKEY] [int] NOT NULL,
 [O_ORDERSTATUS] [char](1) NOT NULL,
 [O_TOTALPRICE] [decimal](15, 2) NOT NULL,
 [O_ORDERDATE] [date] NOT NULL,
 [O_ORDERPRIORITY] [char](15) NOT NULL,
 [O_CLERK] [char](15) NOT NULL,
 [O_SHIPPRIORITY] [int] NOT NULL,
 [O_COMMENT] [varchar](79) NOT NULL
) ON [PRIMARY]
END
GO

IF NOT EXISTS (SELECT * FROM sys.objects WHERE object_id = OBJECT_ID(N'[dbo].[PART]') AND type in (N'U'))
BEGIN
CREATE TABLE [dbo].[PART](
 [P_PARTKEY] [int] NOT NULL,
 [P_NAME] [varchar](55) NOT NULL,
 [P_MFGR] [char](25) NOT NULL,
 [P_BRAND] [char](10) NOT NULL,
 [P_TYPE] [varchar](25) NOT NULL,
 [P_SIZE] [int] NOT NULL,
 [P_CONTAINER] [char](10) NOT NULL,
 [P_RETAILPRICE] [decimal](15, 2) NOT NULL,
 [P_COMMENT] [varchar](23) NOT NULL
) ON [PRIMARY]
END
GO

IF NOT EXISTS (SELECT * FROM sys.objects WHERE object_id = OBJECT_ID(N'[dbo].[PARTSUPP]') AND type in (N'U'))
BEGIN
CREATE TABLE [dbo].[PARTSUPP](
 [PS_PARTKEY] [int] NOT NULL,
 [PS_SUPPKEY] [int] NOT NULL,
 [PS_AVAILQTY] [int] NOT NULL,
 [PS_SUPPLYCOST] [decimal](15, 2) NOT NULL,
 [PS_COMMENT] [varchar](199) NOT NULL
) ON [PRIMARY]
END
GO

IF NOT EXISTS (SELECT * FROM sys.objects WHERE object_id = OBJECT_ID(N'[dbo].[REGION]') AND type in (N'U'))
BEGIN
CREATE TABLE [dbo].[REGION](
 [R_REGIONKEY] [int] NOT NULL,
 [R_NAME] [char](25) NOT NULL,
 [R_COMMENT] [varchar](152) NULL
) ON [PRIMARY]
END
GO

IF NOT EXISTS (SELECT * FROM sys.objects WHERE object_id = OBJECT_ID(N'[dbo].[SUPPLIER]') AND type in (N'U'))
BEGIN
CREATE TABLE [dbo].[SUPPLIER](
 [S_SUPPKEY] [int] NOT NULL,
 [S_NAME] [char](25) NOT NULL,
 [S_ADDRESS] [varchar](40) NOT NULL,
 [S_NATIONKEY] [int] NOT NULL,
 [S_PHONE] [char](15) NOT NULL,
 [S_ACCTBAL] [decimal](15, 2) NOT NULL,
 [S_COMMENT] [varchar](101) NOT NULL
) ON [PRIMARY]
END
GO

And now the part that took quite some time to get this thing working: importing the files with bcp into the SQL Server tables. Every option I tried gave me the following error and it was driving me nuts.

> bcp TPCD.dbo.SUPPLIER in supplier.tbl -w -t"|"  -T

Starting copy...
SQLState = S1000, NativeError = 0
Error = [Microsoft][SQL Server Native Client 11.0]Unexpected EOF encountered in
BCP data-file

0 rows copied.
Network packet size (bytes): 4096
Clock Time (ms.) Total     : 16
     

I found a blogpost on the Shades of orange  site and a suggestion was/is done, that the problem could be in the encoding of the file. I changed the coding from ANSI to UCS-2 Little Endian in Notepad++  and it worked just fine.


This seems to be the problem and now the file is properly imported into the SUPPLIER table.

>bcp TPCD.dbo.SUPPLIER in supplier.tbl -w -t"|"  -T

Starting copy...
1000 rows sent to SQL Server. Total sent: 1000
1000 rows sent to SQL Server. Total sent: 2000
1000 rows sent to SQL Server. Total sent: 3000
1000 rows sent to SQL Server. Total sent: 4000
1000 rows sent to SQL Server. Total sent: 5000
1000 rows sent to SQL Server. Total sent: 6000
1000 rows sent to SQL Server. Total sent: 7000
1000 rows sent to SQL Server. Total sent: 8000
1000 rows sent to SQL Server. Total sent: 9000
1000 rows sent to SQL Server. Total sent: 10000

10000 rows copied.
Network packet size (bytes): 4096
Clock Time (ms.) Total     : 531    Average : (18832.39 rows per sec.)
       

All files are imported into SQL Server, except one and that is the LineItem files. I've used the following command lines and I've converted all files to UCS-2, except the LineItem file. That file gave some troubles.

       
bcp TPCD.dbo.SUPPLIER in supplier.tbl -w -t"|"  -T
bcp TPCD.dbo.REGION in REGION.tbl -w -t"|"  -T
bcp TPCD.dbo.PART in PART.tbl -w -t"|"  -T
bcp TPCD.dbo.NATION in NATION.tbl -w -t"|"  -T
bcp TPCD.dbo.PARTSUPP in PARTSUPP.tbl -w -t"|"  -T
bcp TPCD.dbo.CUSTOMER in CUSTOMER.tbl -w -t"|"  -T
bcp TPCD.dbo.ORDERS in ORDERS.tbl -w -t"|"  -T
bcp TPCD.dbo.LINEITEM in LINEITEM.tbl -w -t"|"  -T
       

The size of the LineItem file is about 750 MB and my Laptop and/or notepad++ doesn't seem to handle this huge text file. I'm recieving the following error: "File is too big to be opened by Notepad++"....This is bad! Now I have to find another tool to convert the file (for only the last one grmph)..After trying some options I found the tool "Text File Splitter 2.0.4". I downloaded it and used the tool for splitting the LINEITEM file into smaller chunks of 1 million rows. Then, I opened the chunk files into notepad++, converted it to the UCS-2 and imported it with BCP. Finally, it worked.

The TPC-H 3NF datamodel

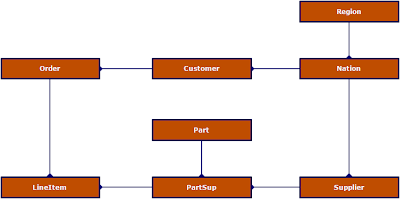
The datamodel that I have created from analyzing the physical tables is shown below. This a typical order entry system that has two transaction tables (Order and LineItem) and multiple Master data tables Region, Nation, Customer, Supplier and PartSup. PartSup is n:m table between Supplier and Part, probably because a supplier can deliver multiple parts and a part can be delivered by multiple suppliers.


The TPC-H dimensional datamodel

This paragraph explains a possible design of a dimensional datamodel. The dimensional datamodel itself is a derivative of the TPC-H datamodel where the structure of the database has been transformed into a star schema, also dropping columns. The dimensional datamodel aligns with the advise and practices considered optimal by Kimball.


There are two Star Schema Benchmark papers that I have been able to access & use. The 2007 paper here, and the 2009 revision (the 3rd revision apparently) of this paper here.

Conclusion

The TPC-H Benchmark is useful addition to the toolset I'm using during developments of SCD dimensions or Datavault implementations. 


Greetz,

Hennie

zondag 15 juli 2012

The business value of (un) structured data (big data)

Introduction

In this blogpost I would like to discuss the big data hype and I want to share some thoughts that I have about the business value of Big Data. Two weeks ago I joined a BIDutch session about Big Data. A couple of presentations were given by presenters and they shared their viewpoints on Big Data. I've gathered some thoughts, draw some pictures and mixed them together with information that was presented at the Big data sessions. Below you can see the results.

Big data and the Business value

At this moment there is a believe that structured data is only 5% of the total amount of data that is available around us. This means that the other information is not structured. There are a couple of types of information: structured, semi structured, quasi structured and unstructured information. I will call semistructured, quasi structured and unstructured information all unstructured information to avoid some confusion. Anyway, the other 95% of information is unstructured. Vendors, goeroes, and other people are saying that Big data is growing rapidly (the four V's) but what about the business value?

One of the presenters stated that Big data has more impact on operational level than on strategic level(!). That started me thinking. I'm not sure whether these are general accepted insights of big data. And, perhaps it will move towards more strategic decision making in the future. But, at this moment it seems that the business value of Big data is more focussed on operational level than on strategic level. Is Big Data bridging a gap of business intelligence on the lower part of organizations perhaps? Much of the Business Intelligence implementations are focussed on Tactical and operational levels, nowadays.


In the diagram above I've drawn the types of data (unstructured and structured) in the middle and draw two triangles on the left and on the right of rectangle. On the left the business impact of unstructured information on an organisation and on the right the impact of structured information on an(other) organization. There are two dimensions in this diagram and these are the assumed impact of the (un)structured information on the organisation as a whole and the assumed impact on the operational, tactical and strategic levels.

Conclusion

This blogpost are just some thoughts about big data. It describes possible business impact of big data on businesses. Discussing the impact on a organisation as a whole and the impact of unstructured data on strategic, tactical and operational levels.

Let me know what you think.

Greetz,
Hennie

maandag 9 juli 2012

Table Scan, Index Scan, Index Seek and RID/Key Lookup operators

Introduction

Currently studying for some Microsoft SQL Server exams and I ran into some articles about tablescan-, indexscan-, index seek- and RID/key lookup operators. I was looking for information about the differences between the types of executionplan operators. This blogpost is a description about queryplan operators regarding indexes.


Table Scan

Table Scan means that the whole table is scanned and every row is returned. Typically, this happens when there is no index defined on the table.


Clustered Index Scan

A Clustered Index Scan is when SQL server reads the whole index looking for matches.  Since a scan touches every row in the index, the cost is proportional to the number of rows in the table. This is only useful for small tables.

There seems some discussion on the Pinal Dave's blog about the whether the Index Scan is the same as a Table Scan. It seems to me that there are some slight differences but these can be ignored.


Clustered Index Seek

An Clustered Index Seek is where SQL server uses the B-tree of the index to seek directly for matching records. Clustered Index seeks are preferred for selective queries and this means that fewer rews are returned when this is used. General speaken the Clustered Index Seek step is used when the optimizer decides that the Clustered index can be used for the index seek otherwise a Index Scan is done (which is mainly the same as a Table Scan).


Non-Clustered Index Seek

Whereas the Clustered Index Seek retrieves records at the leaf levels of the B-tree, the non-clustered index has pointers to the actual data in the clustered index or table (heap).


Key Lookup

A Key Lookup happens when a index does not contains all the information to answer a query and the query optimizer decides to use the information of another index to complete the requested information.


RID lookup

Sames as Key Lookup but then the information of a table is used, instead of a index.


Conclusion

In my opinion the following operators can be ordered by best practice when optimizing your queries:
  1. Clustered Index seek (in case of large selective tables).
  2. Non Clustered Index Seek.
  3. Key lookup.
  4. RID lookup.
  5. Index scan (may be useful for small tables)
  6. Table scan

Greetz,
Hennie

vrijdag 6 juli 2012

Creating a SQL Server 2012 playground (part XII)

Introduction

With Master Data Services of Microsoft, you can create a centralized data source and keep it up to date and reduce redundancies accross applications. Also, Master data is a concept than can easily be translated to dimensions (as in starschemas and facts). Therefore it is a concept that is interesting to understand.

This blogpost covers the installation and configuring Master Data Services. Mainly, the installation steps are :
  1. Installation or verification of the installation of Master Data Services
  2. Configuration of MDS :  Create the Master Data Services Database
  3. Configuration of MDS :  Configuration of the MDS Website
  4. Installation  Microsoft SQL Server 2012 Master Data Services Add-in For Microsoft Excel
MDS is supported on x64 operating systems only.

This blogpost is one in a series of blogposts:
  • Creating a VM environment with virtualbox (part I).
  • Configuration of the domain controller (part II).
  • Creating AD users and installing SQL Server 2012 (part III).
  • Installation of Sharepoint (part IV).
  • Adding the tabular mode instance to the SQL Server installation (part V).
  • Adding the powerpivot mode instance to the SQL Server installation (part VI).
  • Configuring SharePoint Central Administration (part VII).
  • Installing Reporting Services Sharepoint mode as Single Server Farm (part VIII).
  • Installing MS SQL Server Powerpivot for Excel 2010 (part IX).
  • Installation of SSDT and the SSDT Power tools (part X).
  • Installation of Contoso and AdventureWorks databases (part XI).
  • Installation of Master Data Services (part XII).
  • Installation of Data Quality Services (part XIII).
  • etc.

Verify installation

If you haven't done, install the Master Data Services component with the SQL Server 2012 installation disc. I've already installed MDS during the standard installation of SQL Server 2012.


Master Data Services has been installed!

Configuration of MDS

Master Data Service isn't ready for normal usage yet and therefore we need to configure MDS  with the configuration manager. There are two steps to follow: Create the Master Data Services database (step 2) and the configuration of the MDS Website (step 3). Step 1 was the verification of the installation of MDS.

2. Create the Master Data Services Database
The Master Data Services Configuration tool can be found in the Start menu.


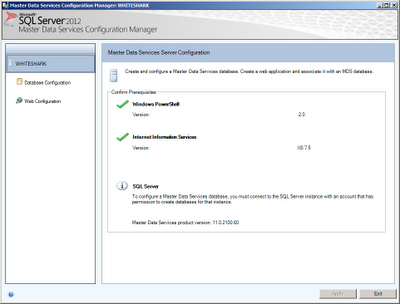
Review the information that is shown in the Server configuration window and ensure that all the required software has been installed.


Click on “Databases” in the left pane and click the “Create Database” button to start the Create Database wizard. Follow the steps in the wizard and supply the required information to create a new MDS database.


The wizard is start up.


Enter the SQL Server instance name in the window.


Enter the databasename at "Database name".


Enter the administrator account at "User name".


And the creation of the database is in progress.


After the database is created, system settings can be adjusted.


3. Configuration of the MDS Website
The next step is to configure the MDS Website. Click “Web Configuration” on the left part of the window to configure a new IIS web application for MDS. The MDS web application can be created as its own web site (root application) or within another web site. The simplest configuration is to create the MDS web application within the existing Default Web Site.
 
Select “Default Web Site” in the Web Site drop down list and Click the "Create Application…" button to create a new MDS web application. Accept the defaults for web application Alias and Application Pool Name (for a default installation offcourse). Type the User name and Password. This should be the same account as provided in the Service Account step of the Create Database wizard. And, click the OK button to create the new web application.

Click a couple of times on the OK button and leave the default settings as proposed bij Microsoft. The Web Configuration should look similar to that shown below


And then choose the web application you will be taken to the MDS getting started page.


MDS Add in for Excel

The "Microsoft SQL Server 2012 Master Data Services Add-in For Microsoft Excel" gives multiple users the ability to update Master data with Excel. Download the .msi from Microsoft. Double click on the .msi and press Next, Next, install and finish.

Conclusion

In this blogpost i've described the installation of MDS.


Greetz,
Hennie


zondag 1 juli 2012

Creating a SQL Server 2012 playground (part XI)

Introduction

In this blogpost I'll describe the installation of the two demo sample databases: Contoso and AdventureWorks. I've downloaded the Contoso software from the Microsoft Download Center and the Adventureworks from Codeplex.  I've copied them to my VM environment and installed them. In this blogpost I'll show you the installation of these databases and the end result of this process.


This blogpost is one in a series of blogposts:
  • Creating a VM environment with virtualbox (part I).
  • Configuration of the domain controller (part II).
  • Creating AD users and installing SQL Server 2012 (part III).
  • Installation of Sharepoint (part IV).
  • Adding the tabular mode instance to the SQL Server installation (part V).
  • Adding the powerpivot mode instance to the SQL Server installation (part VI).
  • Configuring SharePoint Central Administration (part VII).
  • Installing Reporting Services Sharepoint mode as Single Server Farm (part VIII).
  • Installing MS SQL Server Powerpivot for Excel 2010 (part IX).
  • Installation of SSDT and the SSDT Power tools (part X).
  • Installation of Contoso and AdventureWorks databases (part XI).
  • Installation of Master Data Services (part XII).
  • Installation of Data Quality Services (part XIII).
  • etc.


Installation

The first thing I've done is the installation of the Contoso databases on SQL Server 2012. Download the Contoso software and save the two executable files to your hard disk. Copy them to the VM and execute them:
  • ContosoBIdemoBAK.exe
  • ContosoBIdemoABF.exe


There is one SQL database and one SSAS database. Restore them to the Server with the Restore option. 


On the Codeplex site more demo database are available. A familiar Demodatabase is the AdventureWorks database which is present since SQL Server 2005 version. Now Microsoft has made them available for SQL Server 2012. On Codeplex there quite a couple of downloads available, but you don't need them all. These are the one I've used for my blogpost:
  • AdventureWorks2012_CS
  • AdventureWorks2012
  • AdventureWorksDW2012
  • AdventureWorksLT2012


Reattach the databases in SQL Server 2012 and you're in business.

There are also a couple of analytical databases (tabular and multidimensional) available on Codeplex and these are:
  • AdventureWorks Tabular Model SQL 2012.
  • AW Internet Sales Tabular model.
  • AdventureWorksDW2012Multidimensional.

I've installed them and the endsituation is like the screendump below.


Conclusion

In this blogpost I've described the installation of the Contoso and the adventureworks databases.

Greetz,
Hennie

zondag 24 juni 2012

Creating a SQL Server 2012 playground (part X)

Introduction

SSDT is the replacement of BIDS and Visual Studio for Database developers. Also, it includes features from SSMS (James Serra). There seems some confusion about the installation of SSDT BIDS version and the SSDT Database developer version. Somehow some parts are not installed depending on the way you install SSDT. As James states, when you install SSDT during the feature selection window in the installation process of SQL Server 2012 only the BIDS version is installed and not the Database Developer version. If you didn't install SSDT with the SQL Server installation iso and downloaded it from Microsoft then it will install the Database developer functionality, only. So watch out and be careful with this installation of SSDT. 

During the installation of SQL Server 2012 I've selected the SSDT BIDS Version and therefore I need to install the SSDT DB Developer functionality too. This will be explained in this blogpost and I'll show the installation of SSDT Power tools.


This blogpost is one in a series of blogposts:
  • Creating a VM environment with virtualbox (part I).
  • Configuration of the domain controller (part II).
  • Creating AD users and installing SQL Server 2012 (part III).
  • Installation of Sharepoint (part IV).
  • Adding the tabular mode instance to the SQL Server installation (part V).
  • Adding the powerpivot mode instance to the SQL Server installation (part VI).
  • Configuring SharePoint Central Administration (part VII).
  • Installing Reporting Services Sharepoint mode as Single Server Farm (part VIII).
  • Installing MS SQL Server Powerpivot for Excel 2010 (part IX).
  • Installation of SSDT and the SSDT Power tools (part X).
  • Installation of Contoso and AdventureWorks databases (part XI).
  • Installation of Master Data Services (part XII).
  • Installation of Data Quality Services (part XIII).
  • etc.


Installation of SSDT DB Developer functionality

Download the SSDT DB Developer software from the Microsoft download center. I've used the web installer but it's also possible to download the software and install this on multiple machines.

The first screen is like below.


Press Install and the installation of SSDT takes place.


Installation of SSDT Power tools

The next thing to do is the installation of SSDT power tools. You can download this from Microsoft.


But, if you start up Visual studio 2010 and click on Tools, Extension manager and Updates, you'll get a list of all kind of extension for Visual Studio that can be download from Microsoft. When you scroll down a bit the SSDT Powertools is listed.


Press install and after a restart of Visual Studio the extenstion is installed:


It has been a while we have run Windows Update. Let's do it now before we proceed installing more software.

Conclusion

This blogpost is about the installation og SSDT and SSDT Powertools

Greetz,
Hennie

dinsdag 19 juni 2012

Creating a SQL Server 2012 playground (part IX)

Introduction

In this blogpost I'll explain the installation of Powerpivot for Excel installation (download the 64 bit version). You can download the software from MSDN. Powerpivot is an add-in for Excel 2010 and  can be used to include Powerpivot data in Excel. There is also the ability to share the analysis with Microsoft Sharepoint 2010.


This blogpost is one in a series of blogposts:
  • Creating a VM environment with virtualbox (part I).
  • Configuration of the domain controller (part II).
  • Creating AD users and installing SQL Server 2012 (part III).
  • Installation of Sharepoint (part IV).
  • Adding the tabular mode instance to the SQL Server installation (part V).
  • Adding the powerpivot mode instance to the SQL Server installation (part VI).
  • Configuring SharePoint Central Administration (part VII).
  • Installing Reporting Services Sharepoint mode as Single Server Farm (part VIII).
  • Installing MS SQL Server Powerpivot for Excel 2010 (part IX).
  • Installation of SSDT and the SSDT Power tools (part X).
  • Installation of Contoso and AdventureWorks databases (part XI).
  • Installation of Master Data Services (part XII).
  • Installation of Data Quality Services (part XIII).
  • etc.


Installation of Powerpivot for Excel

Installation of Microsoft office
The first step in this blogpost is installing  Microsoft Office 2010. If you run the setup process automatically it will install the 32 bit version. Therefore execute the setup in the 64 bits subfolder of the installation iso.  


Install .net framework 4.0
The next step is the installation of .net Framework 4.0. You can download this from the microsoft download center. There is not much to say about the installation. Just install the .net framework and you're done.

Installation of Visual Studio 2010 Tools for Office Runtime
The installation of Visual Studio 2010 Tools for Office Runtime is also very straightforwared. The Visual Studio 2010 Tools for Office Runtime can be downloaded from Microsoft download center too.

Installation of Powerpivot for Excel
The installation of Powerpivot for Excel is also a very straightforward process and easily done


Check it out
Finally, let's check the installation of powerpivot by opening Excel and click on the Powerpivot ribbon.


Conclusion

In this blogpost I've described an easy installation of Microsoft Office and Powerpivot

Greetz,
Hennie

zaterdag 16 juni 2012

Creating a SQL Server 2012 playground (part VIII)

Introduction

In this blogpost I'll show the installation you  the Reporting Services Sharepoint mode as a Single Farm. The steps include installation of some Features of SQL Server 2012 and a configuration of Sharepoint 2010 Central administration. I've used an article on MSDN for this blogpost.


This blogpost is one in a series of blogposts:
  • Creating a VM environment with virtualbox (part I).
  • Configuration of the domain controller (part II).
  • Creating AD users and installing SQL Server 2012 (part III).
  • Installation of Sharepoint (part IV).
  • Adding the tabular mode instance to the SQL Server installation (part V).
  • Adding the powerpivot mode instance to the SQL Server installation (part VI).
  • Configuring SharePoint Central Administration (part VII).
  • Installing Reporting Services Sharepoint mode as Single Server Farm (part VIII).
  • Installing MS SQL Server Powerpivot for Excel 2010 (part IX).
  • Installation of SSDT and the SSDT Power tools (part X).
  • Installation of Contoso and AdventureWorks databases (part XI).
  • Installation of Master Data Services (part XII).
  • Installation of Data Quality Services (part XIII).
  • etc.


Installing RS Sharepoint in Single Server Mode

Run the SQL Server 2012 installation wizard again and click on "installation".  Choose New SQL Server stand alone installation or add features to an existing installation. Press a couple of times on "OK", "Next" and "Install" until you reach the following window.


Confirm that the options are selected in the red box of the window below.


If they are unchecked install them.

Configuring SharePoint Central Administration

Now the necessary files are already installed during the installation process of SQL Server 2012 ( (part III).  But, the Services need to be registered into the Sharepoint Farm. Therefore some cmdlets needs to be run. Goto Start, Microsoft SharePoint 2010 Products and right click on SharePoint 2010 Management Shell and Click Run as Administrator.


If you haven't configured Sharepoint 2010 the following information is shown. Go to the blogpost VII for configuration of Sharepoint 2010.


Here the error again:


Error "The local farm is not accessible. Cmdlets with FeatureDependencyId are not registered.".

I checked whether the integration of SQL Server Reporting Services Service Application in sharepoint  has happened by opening Central Administration and press on  Manage Service Applications > New and it didn't show up here. If you have configured Sharepoint properly then the error message is not presented. Run the following code

Install -SPRSService

This gives an error because there is a space between Install and -SPRSService.


Correct this to

Install-SPRSService

The following result is shown.


Then execute the following code

Install-SPRSServiceProxy

And

get-spserviceinstance -all |where {$_.TypeName -like "SQL Server Reporting*"} | Start-SPServiceInstance


Now check the Service applications in the Aplication Management section and now the Application is present.


Create a Reporting Service Service Application

In this paragraph I'll explain the basic configuration of the SQL Server Reporting Services Service Application.  As with most of Service Applications you need to provide some base configuration 


Now it's time to watch whether the configuration succeeds.


Once it is finished it will show the following window.


Now check whether the application is installed correctly. 

Conclusion

This blogpost is about installing a single server installation of a Reporting Services report server in SharePoint mode.

Greetz,
Hennie