Posts tonen met het label Azure Data Factory. Alle posts tonen

zondag 2 februari 2020

Azure Series : Passing a parameter to an Azure Data Factory pipeline from SQLDW

Introduction

I've the following scenario for you: there are all kind of deliveries of information in an information factory and when these arrives, We want to trigger an event and load tables that are dependent on this information. So I have a process and I have a delivery(number). This is a base for loading certain tables for some of the customers.

So I have a SQL DWH (Synapse now), a Blob Storage and an Azure Data Factory configured. I've created a solution in the following manner:
  1. Create a file in a blobcontainer with the following format '<process>_<deliverynumber>.trg' from within a stored procedure in Azure SQL Data warehouse.
  2. When a file is detected in a blob container an eventtrigger in Azure Data Factory is executed.
  3. This runs an Azure Data Factory pipeline.
  4. The Azure Data Factory Pipeline will gather the filename and splits the process and delivery information from the filename.
  5. This passed to a stored procedure and the data is written in a table (for demo purposes).
This is described in this blogpost.

1. Create a trigger file

The first step is creating a file in the Blob Storage. This is done with the following statement.

IF EXISTS (SELECT * FROM sys.external_tables 
  WHERE object_id = OBJECT_ID('TestHennieCallPipeline') )  
    DROP EXTERNAL TABLE TestHennieCallPipeline 
    
CREATE EXTERNAL TABLE  TestHennieCallPipeline WITH (
    LOCATION = 'TestHennieCallPipeline_123456790.trg',
    DATA_SOURCE = [BLOB_TRIGGER_CONTAINER],
    FILE_FORMAT = [DoublePipeDelimited_FR2_Outbound]
   ) as select 1 as i from [someschema].[sometable] where 1=2;

Excuting this command will create a file in the blobcontainer (and also a directory).


Creating an event trigger

Now, when the file is created an Event trigger in Azure Data Factory is executed. Here is an example of the Event trigger setup.


This trigger has a parameter but it is not possible to create a parameter in the trigger section. This has to be done in the pipeline pane. There is an option to create triggers available for that.


So, choose for Edit/New Trigger and the following window is shown. The pipeline that will respond on the triggerevent 'TestHennie'. Parameters is equal to 1 because I've already created a parameter.


Click on the name, in this case 'TestHennie', and click two times on Continue until the following screen appears. Here you can enter a parameter and I've included a system variable here.


The system variable is needed for retrieving the name of the file.

@triggerBody().fileName

Create a ADF Pipeline

One of the next steps is creating an Azure Data Factory pipeline for this experiment, I have created two activities: a set variable and stored procedure activity.

The first one is for setting values in variables and the other one is for debugging. The stored procedure will insert the data into a table.

Create a parameter in the pipeline

Creating a parameter in the pipeline is the following step in this experiment. I've created a parameter SourceFile. This parameter is used in the trigger.


Create a user variable in the pipeline

Now in order to do some manipulation of the filename that is retrieved and stored in the parameter, I've added an user variable to the pipeline. This will be used in the Set Variable activity.


Set the variable as a parameter to a stored procedure

Then, I've created an expression in the Set Variable Activity. In this actvity it's possible to use different kinds of funtions and these can be mixed together in order to get the desired result.


Next, I've built an expression and it would be nicer if I could have used less functions and perhaps it's possible. But for now, it will do.

@substring(pipeline().parameters.SourceFile, 
    add(indexof(pipeline().parameters.SourceFile,'_'),1),
    sub(indexof(pipeline().parameters.SourceFile,'.'), 
     add(indexof(pipeline().parameters.SourceFile,'_'),1)
    )
    )

Pass the variable as a parameter to a stored procedure

I've created a stored procedure that adds a record to a table. This way it's possible to investigate the values.


Here the simple table and procedure and some scripting

CREATE TABLE _Hennie (
  Deliverynumber  nvarchar(50)
  )

SELECT * FROM  _Hennie

CREATE PROCEDURE TestHennie (@deliverynumber varchar(50))
AS
BEGIN
 INSERT INTO _Hennie (Deliverynumber) VALUES (@deliverynumber)
END


TRUNCATE TABLE  _Hennie

And the result is that the deliverynumber is derived from the file name based on the expression and written in the table.


Thats it!

maandag 21 oktober 2019

Azure series : The Mapping Data Flow activity in Azure Data Factory

Introduction

The Mapping Data Flow activity is an activity that has been added recently (2019) and has a lot of similarities with SSIS dataflow task and so for SSIS developer it has a steep learning curve to learn Azure Data Factory Mapping Data Flow activity.

In this blogpost I'll explore the basics of the Mapping Data Flow activity (everytime, I want to type task instead activity), the operations available in the data flow, and more.

If you want to join in here, prerequisite for this exercise is the Azure data factory is already created and two SQL database are present : SourceDB with AdventureWorksLT installed and one empty database with a table customer.

This is my starting situation.


Let's explore Azure Data Factory and start creating some items.

First steps

Now, the first step is to create a pipeline in ADF and give it a proper name. A pipeline is like a control flow in SSIS (It can control the direction of activities) There two options to create an Azure Data Factory.


If you have chosen to create a pipeline in Azure Data Factory, the following screen is shown. It is a screen that exists of different parts. I've indicated the different parts with a red box and a number.


The following parts are shown :
  1. Top menu
  2. The factory resources
  3. The connections (linked services) and trigger
  4. The components you can choose from. 
  5. The template menu
  6. Graph (seems to me a bit of an odd name)
  7. The configuration panel

Lets start this exercise by creating and renaming a pipeline and I'll name it "MyMapingDataFlowPieline". 


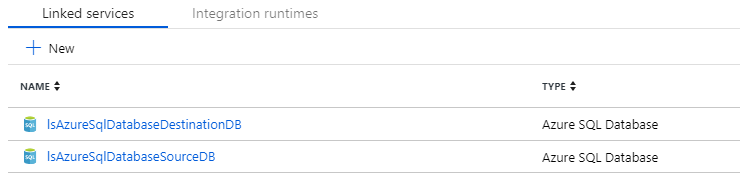
Next step is to add the datasets and the connections (linked service). One data set for the source table and one for the destination table. I'm using a naming convention 'ds' for Dataset and ls for the Linked service. I'll blog about the naming convention of the components in the future as I'm currently determining the best practice for naming convention. There are some blogposts about naming convention, but they seems not very comprehensive. As a linked service is comparable to a connection, it is possible to have multiple datasets based on a linked service and therefore the naming convention should reflect the source type (eg. MS SQL Database) and not the table (for instance).

The linked services I've created for this blogpost.


The datasets that have been created, so far.

The script that I've used to create the table in the destinationDB. In future blogpost I'll elaborate further on this blogpost and I'll use this table for SCD Type I and SCD type II in Azure Data Factory. 


DROP TABLE IF EXISTS [DimCustomer]
GO

CREATE TABLE [DimCustomer](
 [CustomerID] int NOT NULL,
 [NameStyle] varchar(50)  NULL,
 [Title] [nvarchar](8) NULL,
 [FirstName] varchar(50)  NULL,
 [MiddleName]varchar(50) NULL,
 [LastName] varchar(50)  NULL,
 [Suffix] [nvarchar](10) NULL,
 [CompanyName] [nvarchar](128) NULL,
 [SalesPerson] [nvarchar](256) NULL,
 [EmailAddress] [nvarchar](50) NULL,
 [Phone] varchar(50) NULL,
 [PasswordHash] [varchar](128)  NULL,
 [PasswordSalt] [varchar](10)  NULL,
 [rowguid] [uniqueidentifier]  NULL,
) ON [PRIMARY]
GO


So, we have created the Azure Datafactory, the two azure SQL databases, one with AdventureWorksLT and one with DimCustomer table, the pipeline with two linked services and two datasets. We are ready to create the Mapping data flow.

Drag the mapping data flow on the graph canvas and drag a source and a sink on the canvas. In the end it will look the following screenshot:


Now in order to test this, we need to turn on the Data Flow Debug. Turning this option on will take some time.


After a while you can run the mapping data flow task with the Debug option.


And the status of the run is shown in the output tab in the configuration panel.


And If we check the results in SSMS we can see there is data in the table.


Final Thoughts

This is a blogpost about a simple copy process. In the future I'll blog more about the Azure Data Factory and working towards more complicated examples.

Hennie