Posts tonen met het label SQLAzure. Alle posts tonen

donderdag 16 april 2020

Azure Series : Synchronization between Azure Databases

Introduction

I have to copy a couple of tables of about 200 million rows between a couple Azure SQL databases, just once or perhaps twice. I don't know it exactly. Now, in SQL Server (on-prem) you have some options and it's fairly easy copying data but in Azure it's a different ballgame. If the data is not very much you can use the "Generate scripts" and choose the option "data only" resulting in scripted data in INSERT statements. I tried the bacpac option in SSMS but I received a lot of validation errors because (perhaps) the database was not in a consistent state. I didn't investigate this much further. One another trick I tried was using SSIS, my old favorite ETL Tool. Although I enjoy the tool a lot, it seems that the integration and alignment with Azure should be better. Although, It is a good backup for my problem, I would like to know if there is somethnig better, easier or faster to use. So my options were starting to get smaller and smaller. Elastic queries could be an option but I have been there, done that before and so I ended up with experimenting with synchronization groups in Azure SQL Databases. This blogpost is a description of the process and investigation on how to setup synchronization between Azure SQL Database. I hope you find it useful and leave me note when you have remarks or questions.

The setup

Firstly, what are synchronization groups in Azure SQL Database? Well, it is a synchronization tool for data synchronization between Azure SQL Databases and on-premise SQL Servers (you have to install an agent). For this blogpost, I am only interested in synchronization between Azure SQL databases.


There are two types of databases: Hubs and Members.  

The configuration

First, create a sync group in the Azure Portal, Navigate to the database and search for "Sync to other databases" and click on that.


Create a new sync group with "New Sync Group"


Enter the Sync group name and I choose to use existing database and all of the databases are shown in the drop down box and I choose the Hub database. The next step is choosing the member database that is used for the synchronization.


The member database is used for the sync member.


And the next step is choosing the tables (and clumns if you wish) to sync from, but in my case it seems like saying for hours: "loading tables"....hmpf...


After a couple of tries and clicking around the following error message appears and now things were getting more and more clearer. The service has nog access to the Azure SQL Database Server.


So I set this option : Allow Azure services to access the server!


And now I recieved another error message, something about a bad login.


After correcting the password, all of a sudden I received a list of tables. I'm not sure but I took some while to manage this, but may be it's just me.


In the next step I can even choose columns for synchronization. There are some not supported columns over there. I leave that for later to investigate.

The execution

All ready and I pressed on the Sync button and some magic happened. The table is synchronized to the other database!


Some logging appears and it seems that the synchronization is succeeded.


Let's take a look in the database, but hey there are some tables in the database I didn't expect and seems a bit awkward. These tables are needed for the synchronization between the databases.


Also in the member database a lot of synchronization (meta) tables were created.


Final thoughts

I expected/hoped that the synchronization of databases is a kind of replacement of the import/export of data of the on premise SQL Server version, a one stop copy and paste method, but it's more like a synchronization tool, as off course the name implies. So for a simple copy action it's usable but you will get a lot of tables in your database unless you use a meta data database. 


Hennie

zondag 3 november 2019

Azure series : Elastic queries

Introduction

Not all people know that it is possible to run queries on other Azure SQL Databases. Normally with on-premise databases, we are used to use the following cross database query :


SELECT * FROM SourceDB.[SalesLT].[Customer]


But it will run into an error in Azure :

Msg 40515, Level 15, State 1, Line 16
Reference to database and/or server name in 'SourceDB.SalesLT.Customer' is not supported in this version of SQL Server.

From Microsoft : "The solution is using elastic queries. The elastic query feature enables you to run a Transact-SQL query that spans multiple databases in Azure SQL Database. It allows you to perform cross-database queries to access remote tables, and to connect Microsoft and third-party tools (Excel, Power BI, Tableau, etc.) to query across data tiers with multiple databases. Using this feature, you can scale out queries to large data tiers in SQL Database and visualize the results in business intelligence (BI) reports"

For this blogpost I've used the following link by David Postlethwaite and there other great resources on this topic too.

This is the setup of the databases:

I've gathered the steps to create elastic queries in this blogpost.

1. Create the login

First start with creating a login in the master database for the user we are going to use.


-- Go to Master database
USE Master
GO

CREATE LOGIN ElasticUser WITH PASSWORD = '6rJbb3Gh@Bq):ngE'
GO


2. Create the user in the source database

Create the user in the SourceDB database and assign it to the db_owner role.

USE SourceDB
GO

CREATE USER ElasticUser FOR LOGIN ElasticUser
GO

ALTER ROLE [db_owner] ADD MEMBER ElasticUser
GO

2. Create the user in the destination database

Then create the user in the DestinationDB database and again assign it to db_owner role


USE DestinationDB
GO

CREATE USER ElasticUser FOR LOGIN ElasticUser
GO

ALTER ROLE [db_owner] ADD MEMBER ElasticUser
GO


Create the master key

Create the Master Key in the DestinationDB database with a strong passowrd. This will create a symmetric key in order to protect the private keys in the database.


/*
DROP MASTER KEY 
GO
*/

CREATE MASTER KEY ENCRYPTION BY PASSWORD = '6rJbb3Gh@Bq):ngE';


Create the database scoped credential

Then create the database scroped credential with the CREATE DATABASE SCOPED CREDENTIAL statement.  The credential is used by the database to access to the external location anytime the database is performing an operation that requires access.


/*
DROP DATABASE SCOPED CREDENTIAL henniecredential
GO
*/

CREATE DATABASE SCOPED CREDENTIAL ElasticCredential WITH IDENTITY = 'ElasticUser',
SECRET = '6rJbb3Gh@Bq):ngE';


Create the external data source

The CREATE EXTERNAL DATA SOURCE is used for the connectivity and is used by the elastic queries. The script for creating the external data source is as follows:

/*
DROP EXTERNAL DATA SOURCE [sourceDB]
GO
*/

CREATE EXTERNAL DATA SOURCE sourceDB WITH
(TYPE = RDBMS,
LOCATION = 'server-280742145.database.windows.net', 
DATABASE_NAME = 'SourceDB',
CREDENTIAL = ElasticCredential
) ;
GO

Create the schema

I'm using the Customer table from the AdventureWorksLT database and the table is created in the SalesLT schema and therefore we need to create a schema with the same name in the destinationDB.


/*
DROP SCHEMA IF EXISTS SalesLT
GO
*/
CREATE SCHEMA SalesLT
GO 


Create the external table

The following statement creates the external table for the SalesLT.Customer table.


/*
DROP EXTERNAL TABLE [SalesLT].[Customer]
GO
*/

CREATE EXTERNAL TABLE SalesLT.[Customer](
 [CustomerID] [int] NOT NULL,
 [NameStyle] bit NOT NULL,
 [Title] [nvarchar](8) NULL,
 [FirstName] nvarchar(50) NOT NULL,
 [MiddleName] nvarchar(50) NULL,
 [LastName] nvarchar(50) NOT NULL,
 [Suffix] [nvarchar](10) NULL,
 [CompanyName] [nvarchar](128) NULL,
 [SalesPerson] [nvarchar](256) NULL,
 [EmailAddress] [nvarchar](50) NULL,
 [Phone] nvarchar(25) NULL,
 [PasswordHash] [varchar](128) NOT NULL,
 [PasswordSalt] [varchar](10) NOT NULL,
 [rowguid] [uniqueidentifier] NOT NULL,
 [ModifiedDate] [datetime] NOT NULL,
 )
WITH
(
DATA_SOURCE = sourceDB
);


After running the DDL statements, you can access the remote table “Customer” as though it were a local table. Azure SQL Database automatically opens a connection to the remote database, processes your request on the remote database, and returns the results.

Test the External Table

Test the external query with a select query and see if we can get some results back.


SELECT * FROM  SalesLT.[Customer]


And this results in the following result!!


Now if there is a difference in the datatype for one tiny length or datatype you will receive the following error

The data type of the column 'Phone' in the external table is different than the column's data type in the underlying standalone or sharded table present on the external source.

Final thoughts

This blogpost is about creating external tables using in elastic queries. 

Hennie

maandag 21 oktober 2019

Azure series : The Mapping Data Flow activity in Azure Data Factory

Introduction

The Mapping Data Flow activity is an activity that has been added recently (2019) and has a lot of similarities with SSIS dataflow task and so for SSIS developer it has a steep learning curve to learn Azure Data Factory Mapping Data Flow activity.

In this blogpost I'll explore the basics of the Mapping Data Flow activity (everytime, I want to type task instead activity), the operations available in the data flow, and more.

If you want to join in here, prerequisite for this exercise is the Azure data factory is already created and two SQL database are present : SourceDB with AdventureWorksLT installed and one empty database with a table customer.

This is my starting situation.


Let's explore Azure Data Factory and start creating some items.

First steps

Now, the first step is to create a pipeline in ADF and give it a proper name. A pipeline is like a control flow in SSIS (It can control the direction of activities) There two options to create an Azure Data Factory.


If you have chosen to create a pipeline in Azure Data Factory, the following screen is shown. It is a screen that exists of different parts. I've indicated the different parts with a red box and a number.


The following parts are shown :
  1. Top menu
  2. The factory resources
  3. The connections (linked services) and trigger
  4. The components you can choose from. 
  5. The template menu
  6. Graph (seems to me a bit of an odd name)
  7. The configuration panel

Lets start this exercise by creating and renaming a pipeline and I'll name it "MyMapingDataFlowPieline". 


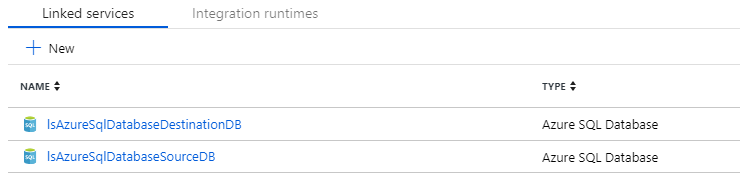
Next step is to add the datasets and the connections (linked service). One data set for the source table and one for the destination table. I'm using a naming convention 'ds' for Dataset and ls for the Linked service. I'll blog about the naming convention of the components in the future as I'm currently determining the best practice for naming convention. There are some blogposts about naming convention, but they seems not very comprehensive. As a linked service is comparable to a connection, it is possible to have multiple datasets based on a linked service and therefore the naming convention should reflect the source type (eg. MS SQL Database) and not the table (for instance).

The linked services I've created for this blogpost.


The datasets that have been created, so far.

The script that I've used to create the table in the destinationDB. In future blogpost I'll elaborate further on this blogpost and I'll use this table for SCD Type I and SCD type II in Azure Data Factory. 


DROP TABLE IF EXISTS [DimCustomer]
GO

CREATE TABLE [DimCustomer](
 [CustomerID] int NOT NULL,
 [NameStyle] varchar(50)  NULL,
 [Title] [nvarchar](8) NULL,
 [FirstName] varchar(50)  NULL,
 [MiddleName]varchar(50) NULL,
 [LastName] varchar(50)  NULL,
 [Suffix] [nvarchar](10) NULL,
 [CompanyName] [nvarchar](128) NULL,
 [SalesPerson] [nvarchar](256) NULL,
 [EmailAddress] [nvarchar](50) NULL,
 [Phone] varchar(50) NULL,
 [PasswordHash] [varchar](128)  NULL,
 [PasswordSalt] [varchar](10)  NULL,
 [rowguid] [uniqueidentifier]  NULL,
) ON [PRIMARY]
GO


So, we have created the Azure Datafactory, the two azure SQL databases, one with AdventureWorksLT and one with DimCustomer table, the pipeline with two linked services and two datasets. We are ready to create the Mapping data flow.

Drag the mapping data flow on the graph canvas and drag a source and a sink on the canvas. In the end it will look the following screenshot:


Now in order to test this, we need to turn on the Data Flow Debug. Turning this option on will take some time.


After a while you can run the mapping data flow task with the Debug option.


And the status of the run is shown in the output tab in the configuration panel.


And If we check the results in SSMS we can see there is data in the table.


Final Thoughts

This is a blogpost about a simple copy process. In the future I'll blog more about the Azure Data Factory and working towards more complicated examples.

Hennie

zaterdag 26 augustus 2017

Azure : Building a VM with SQL Server in Microsoft Azure

Introduction

In this blogpost I'll show you how to create a VM in Microsoft Azure. The purpose of this blogpost is describing the steps installing the VM. I'm doing this for an Edx course I'm currently following. Now what confuses me a bit is the option of installing a VM with SQL

Creating a VM with SQL Server 2016

First login into Microsoft Azure and click on Virtual Machines in the left blade.


Choose the Free license SQL Server 2016 SP1 Developer on Windows Server 2016.


In the next step it's possible to choose the deployment model. I choose to use the standard : Resource manager.


Now fill in some basic information about the VM.


Next step is to choose the size of the VM. There are different pricing models.


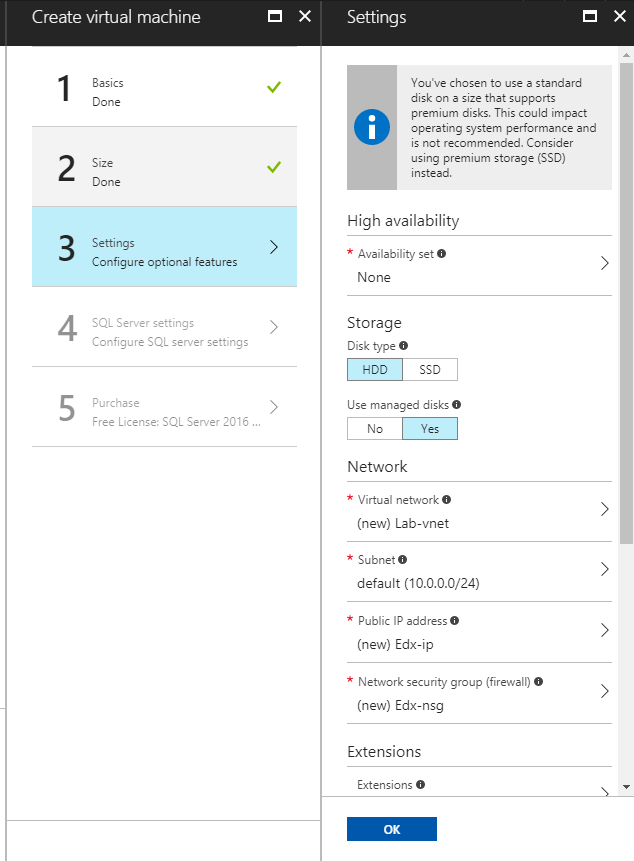
Next step is setting up the Storage, network information. I choose the cheaper option HDD. 


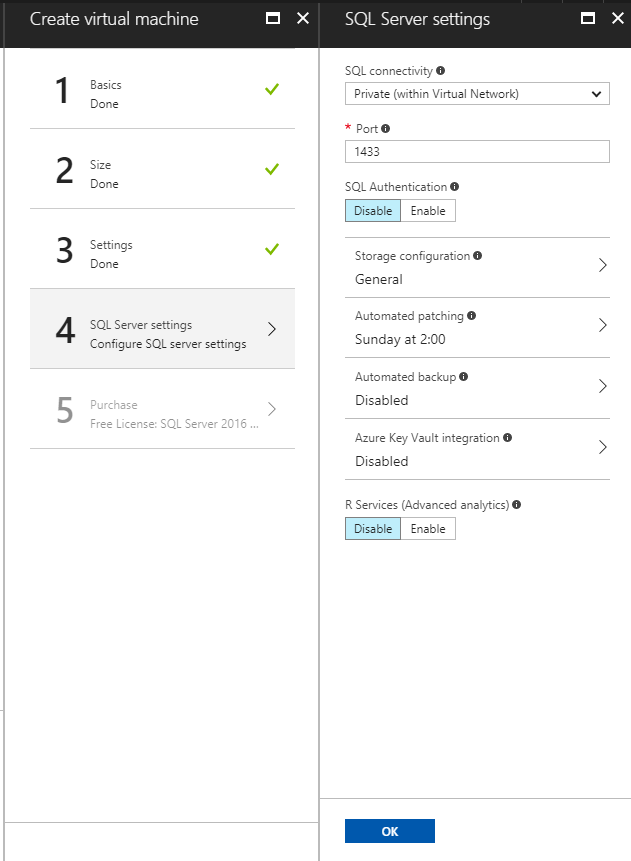
Now, the next step is is setting up the SQL Server settings.


And the last step contains an overview of all of the settings of the Virtual machine.


Scrolling down will show some more information


Creating the VM will take a 15 - 20 minutes.


And this is an overview of the settings of the VM.


Conclusion

This blogpost is about creating a VM with Microsoft Azure and spinning up a VM is very easy.


Hennie

zondag 24 juni 2012

Creating a SQL Server 2012 playground (part X)

Introduction

SSDT is the replacement of BIDS and Visual Studio for Database developers. Also, it includes features from SSMS (James Serra). There seems some confusion about the installation of SSDT BIDS version and the SSDT Database developer version. Somehow some parts are not installed depending on the way you install SSDT. As James states, when you install SSDT during the feature selection window in the installation process of SQL Server 2012 only the BIDS version is installed and not the Database Developer version. If you didn't install SSDT with the SQL Server installation iso and downloaded it from Microsoft then it will install the Database developer functionality, only. So watch out and be careful with this installation of SSDT. 

During the installation of SQL Server 2012 I've selected the SSDT BIDS Version and therefore I need to install the SSDT DB Developer functionality too. This will be explained in this blogpost and I'll show the installation of SSDT Power tools.


This blogpost is one in a series of blogposts:
  • Creating a VM environment with virtualbox (part I).
  • Configuration of the domain controller (part II).
  • Creating AD users and installing SQL Server 2012 (part III).
  • Installation of Sharepoint (part IV).
  • Adding the tabular mode instance to the SQL Server installation (part V).
  • Adding the powerpivot mode instance to the SQL Server installation (part VI).
  • Configuring SharePoint Central Administration (part VII).
  • Installing Reporting Services Sharepoint mode as Single Server Farm (part VIII).
  • Installing MS SQL Server Powerpivot for Excel 2010 (part IX).
  • Installation of SSDT and the SSDT Power tools (part X).
  • Installation of Contoso and AdventureWorks databases (part XI).
  • Installation of Master Data Services (part XII).
  • Installation of Data Quality Services (part XIII).
  • etc.


Installation of SSDT DB Developer functionality

Download the SSDT DB Developer software from the Microsoft download center. I've used the web installer but it's also possible to download the software and install this on multiple machines.

The first screen is like below.


Press Install and the installation of SSDT takes place.


Installation of SSDT Power tools

The next thing to do is the installation of SSDT power tools. You can download this from Microsoft.


But, if you start up Visual studio 2010 and click on Tools, Extension manager and Updates, you'll get a list of all kind of extension for Visual Studio that can be download from Microsoft. When you scroll down a bit the SSDT Powertools is listed.


Press install and after a restart of Visual Studio the extenstion is installed:


It has been a while we have run Windows Update. Let's do it now before we proceed installing more software.

Conclusion

This blogpost is about the installation og SSDT and SSDT Powertools

Greetz,
Hennie

woensdag 4 april 2012

My first SQLAzure database!

Introduction

At Microsoft Virtual Academy you can take all kind of courses about Microsoft products. I've decided to follow the course about SQL Azure. There are all kind of articles about SQL Azure included and a lot of videos about SQL Azure. These are very informative. If you want to know more about SQL Azure I can recommend you following these courses.

In this blogpost I'll descibe a first exploration of SQL Azure. First I'll describe the registration process, then creating my first SQL Azure database and finally connecting with the database with SQL Server Management Studio.


Registration

First, registration for SQL Azure is needed at the windows Azure portal. You can register for windowsazure at the windows azure site and press select "buy" . The screens below are in the dutch language. Apologizes for that.


Press Next.


Login in with your windows live account


Then, a code verification is needed. A text message is send to your cell phone.


Enter your creditcard information and you're in.


My first SQL Azure database

This paragraph is about creating a simple SQL Azure database. The screen below is a maintenance window of the windows azure platform. Click on 'Database' for creating the SQL Azure database.


But, first we need to create a new server:


Enter an administrator login for the server


Enter the IP address.


And now it's really time to create a database in Azure.


The following window shows the database information.


The database is created now and I can test the database with the test connectivity option.


And enter your account.


Connect with Management Studio

In this pragraph I'll describe creating the database.First login to SQL Azure


And enter the web enables database objects editor.


Below, i'm creating my first table with SQL Azure!!


Now startup SQL Server Management studio and try to connect to the SQLAzure server:


At first i couldn't connect to the SQLAzure database. The following message kept on coming:


TITLE: Connect to Server
------------------------------


Cannot connect to xxxxxxxxx.database.windows.net.


------------------------------
ADDITIONAL INFORMATION:


Login failed for user 'xxxxxxx'.
This session has been assigned a tracing ID of '1xxxxxxd-155xxxxx8-afcd-d1ffeefb5d90'.  Provide this tracing ID to customer support when you need assistance. (Microsoft SQL Server, Error: 18456)


For help, click: http://go.microsoft.com/fwlink?ProdName=Microsoft%20SQL%20Server&EvtSrc=MSSQLServer&EvtID=18456&LinkId=20476

I tried a lot of things as suggested on many sites. Nothing seemed to work. But, when I opened a query to a on premise database and  then changed the connection to the SQLAzure FQDN, it worked!!!


And now connecting with the connect button works too.


And let's check the results of the insert script in the SQL Azure portal


Conclusion
It's very easy to create a database in SQL Azure. I can't say much for now about SQL Azure. I had some troubles connecting with the SQL Azure server but after some trails it seems to be working now.

Greetz,
Hennie