donderdag 23 mei 2019

An introduction to Azure Data Studio

Introduction

Until recently I have been using SQL Server Management Studio for developing code with SQL Server. I really love this tool, but it has grown into a comprehensive - and sometimes awkward tool to use. Azure Data Studio is a lightweight software tool that makes developing and administration of SQL Server easier than SQL Server Management Studio. ADS can be used on multi platforms like MacOS, Linux and Windows and is integrated with Git. You can find more information here.

So in short Azure Data studio has the following interesting features :
  • Different kernels like SQL and python.
  • Code snippets.
  • Integration with Source control.
  • Powershell support.
  • Notebooks.

Installation of Azure Data Studio

First let's start with downloading the Azure Data Studio from the download location. Here you can find the installation files for Linux, MacOS en Windows. I choose the windows User installation files of the latest version (May 2019, version 1.7.0). The installation is fairly easy and it's a matter of Next, Next and Next.

The initial screen is a simple screen where you can set the database connection.


After you set the database connection strings you're set to go using the Azure Data Studio.

Executing a script

The first thing I tried is executing a script in ADS.


I checked the error messages in SSMS and they are exactly the same.

Searching objects

Finding objects in ADS is a bit different than in SSMS. You can find objects by using prefixes like t: for tables and sp: for stored procedures.


Browsing objects on a server is also possible.


Notebooks 

Notebooks are new in Azure Data Studio. I know about notebooks because of I use them during jobs, R Courses and AI courses (jupyter). It is an easy way to share code. I like the way notebooks work. It's like telling story with code all together. Who hasn't joined a project with nothing else but code. Wouldn't it be great when thoughts, decisions are well written in a story together with the code. I'm note sure whether developers are the targetted people of notebooks, I think that people who work with data like data scientists and analysist will appreciate this functionality very much

There are a couple of options creating a notebook. One option is with the menu option and another way is to use the command palette. I choose the latter one. Yet another surprise is that you can write in Spark | R, Python and Pyspark in Azure Data Studio. These are kernels.


Creating a notebook is easy to do. You can add codeblocks and you can add text(blocks) and that by each other. It is possible to have multiple lines of code in a code block.


The notebook is saved as a .ipynb extension and that is can be used in Microsoft Azure notebooks.

Code snipppets

Adding code snippets is very easy in Azure Data Studio. Open a query and type in sql. Typing sql will open a dropdown menu where it is possible to choose a template.


Source explorer

It is also possible to integrate source explorer in Azure Data Studio. Initially, the source explorer is showing an error message "No source control providers registered". In order to have a proper working source control integration it is necessary to install a Source control provider.


In this particular case I'll download git and install git in a standard manner.


Next step is creating a working folder. Click on open Folder and locate the folder you want to work from and click OK. In my case, I'm using D:\Git. Now it is possible to use the git integratoin in ADS.


After initializing git the following git options are available.


It seems there is not a native support for Azure DevOps yet. It's possible to download extensions where you add support for Azure DevOps.

Final thoughts

I've scratched the surface on how to work with Azure Data Studio aka ADS. It is an interesting tool to use and I'll decide in the near future whether I'm going to leave SSMS and use ADS. Time will tell.

One thing I noticed is that ADS is quite CPU intensive. I'm using a fairly old laptop with a VM and it happens that the CPU is sky high on 100% and that problem doesn't occur with SSMS. Probably it's my old laptop that gives this problem.

Hennie

donderdag 9 mei 2019

Microsoft: DAT263x Introduction to Artificial Intelligence (AI)

Introduction

I'm participating in the Microsoft Professional Program AI by Micrsosoft. I've already done the programs Datascience and Big data. These are also part of the Microsoft Professional Programs. I've experienced them as an easy to follow instruction based courses. There are more of these programs available that are interesting for data enthusiasts. Think about Internet of Things and Data analysis

The great thing about these programs is that these programs consists of high quality instructor led courses, broken in easy to digest videos, exercises, labs and quizzes on the Edx site. So every minute spare time you have you can follow a couple of videos.

The program is broken in the following courses :
This blogpost describes the experiences I had with the first course : Introduction to Artificial Intelligence (AI).

DAT263x Introduction to Artificial Intelligence (AI)

This course is about an introduction of AI and exists of the following parts:
  • Machine learning
  • Language and communication
  • Computer vision
  • Conversation as a platform
Machine learning is a very lightweight introduction of machine learning and not a very comprehensive overview of the different terminology like AI, machine learning and deep learning.  Very quickly the course presents Azure ML Studio with regresssion, classification and clustering.   

Language and communication is about textprocessing, an introduction to NLP and using the application in Azure LUIS (Language Understanding Intelligent Service) with intents and how to use language processing in an example. 

Computer vision is an introduction to get you starting with image processing and working with Images and Videos.

Conversation as a platform is about the bots: an introduction and how to build an intelligent bots

Final thoughts

I haven't followed the complete program yet (disclaimer alert!). The course is mostly about the products of Microsoft and is very hands-on. For a very theoretical, or an overview of AI I would rather look into another course like that of Andrew Ng on Coursera. Although I didn't participated in that specialization track yet, I think that kind of a course is more about the theory of AI. 

But, if you want to know more about the products of Microsoft and how these are related to AI, I would recommend this program of Microsoft. I've learned about products like LUIS and didn't knew before.

I'll let you know my progress in the program!

Hennie

zondag 28 april 2019

DevOps series : tSQLt Framework

Introduction

In one of my former projects I gained a lot of experience with building, testing and releasing with Azure DevOps and I noticed that unit testing in the database is a good thing to do. In my current project we are using tSQLt Framework for testing purposes. This blogpost is about the tSQLt framework, on how to install and how to use. The first basic steps in order to get you (and me) going.

Why is unittesting important? Well, I have noticed during my work as a consultant that releasing code can be very cumbersome and tricky when you're not convinced that everything still works, even the code you have not touched. May be something has changed in the data that will gives errors somewhere else. So running unittests before you release, is a very good thing to do!

tSQLt is free and is downloadable. There are a couple of steps that you have to do to make it work. You have to spend some time in using the stored procedure calls and scripting to understand to working of the tSQLt framework.

For this blogpost I've used some inspiration from sqlshack.

Installation of the tSQLt framework

First download the files from tsqlt.org and unzip it somewhere on your disk, like I've done below. There are a couple of sql files.


The next step is the installation of an example of the framework into SQL Server. That is the example.sql file. Open SSMS and execute the example.sql file.


Executing the tests scripts in the example file succeeds except one. The last unittest gives an error, unfortunately.


Below is the specific error of the test that is executed.


So the test is failed and therefore we need to check whether what went wrong. Is the test not good defined or something else has happened?


I changed to > into >= and execute the testexecution again and now it runs properly.


My first tSQLt testscript

Now the next step I've done is executing my own script (with a little help from sqlshack). I've created a database, a customer table and inserted a record and added a stored procedure that I would like to test.


CREATE DATABASE TestThetSQLtFramework
GO

USE TestThetSQLtFramework;
GO
 
CREATE TABLE [dbo].[Customer] (
    [CustomerId]       INT           IDENTITY (1, 1) NOT NULL,
    [Name]             VARCHAR (40)  NOT NULL,
);

SET IDENTITY_INSERT [dbo].[Customer] ON
INSERT INTO [dbo].[Customer] ([CustomerId], [Name]) VALUES (1, N'Hennie')
SET IDENTITY_INSERT [dbo].[Customer] OFF

SELECT * FROM [Customer]


CREATE PROCEDURE AddCustomer(@Name VARCHAR(40))
AS
BEGIN
  
  INSERT INTO dbo.[Customer] (Name)
  VALUES (@Name)
    
END
GO


The next step is to run the test framework, and it seems nothing is there, and the test process is executed properly. Off course that is because there is no test there.


EXEC tSQLt.RunAll

(0 rows affected)
 
+----------------------+
|Test Execution Summary|
+----------------------+
 
|No|Test Case Name|Dur(ms)|Result|
+--+--------------+-------+------+
-----------------------------------------------------------------------------
Test Case Summary: 0 test case(s) executed, 0 succeeded, 0 failed, 0 errored.
-----------------------------------------------------------------------------

The following step is creating a test class (aka a schema) in the database.

EXEC tSQLt.NewTestClass 'CustomerTests';
GO

Then, a test stored procedure has to be created in the database with three steps : Assemble, Act and Assert.

ALTER PROCEDURE [CustomerTests].[TestAddCustomer]
AS
BEGIN
 -- Assemble
        EXEC tSQLt.FakeTable 'dbo.Customer', @Identity = 1

    Create TABLE [CustomerTests].[Expected] 
 (
   [CustomerId] INT NOT NULL,
   [Name] VARCHAR(40) NOT NULL,
 )

 INSERT INTO [CustomerTests].[Expected] (CustomerId,Name)
 VALUES (1,'Hennie')

 -- Act
 EXEC dbo.AddCustomer 'Hennie' 
 SELECT * INTO CustomerTests.Actual FROM dbo.Customer 
 
  -- Assert (compare expected table with actual table results)
 EXEC tSQLt.AssertEqualsTable @Expected='CustomerTests.Expected', 
        @Actual='CustomerTests.Actual'
END;
GO

Executing the stored procedure will result in the following output. All is fine!


EXEC tSQLt.RunAll

(1 row affected)
 
+----------------------+
|Test Execution Summary|
+----------------------+
 
|No|Test Case Name                   |Dur(ms)|Result |
+--+---------------------------------+-------+-------+
|1 |[CustomerTests].[TestAddCustomer]|    113|Success|
-----------------------------------------------------------------------------
Test Case Summary: 1 test case(s) executed, 1 succeeded, 0 failed, 0 errored.
-----------------------------------------------------------------------------


Now, see what happens when I change the output from the desired output. I changed  Hennie into Hennie2 in the call of the stored procedure.

-- Act
EXEC dbo.AddCustomer 'Hennie2' 
SELECT * INTO CustomerTests.Actual FROM dbo.Customer 

Excuting the RunAll SP of the tSQLt framework will result in an error in the test framework.

EXEC tSQLt.RunAll


(1 row affected)
[CustomerTests].[TestAddCustomer] failed: (Failure) Unexpected/missing resultset rows!
|_m_|CustomerId|Name   |
+---+----------+-------+
|<  |1         |Hennie |
|>  |1         |Hennie2|
 
+----------------------+
|Test Execution Summary|
+----------------------+
 
|No|Test Case Name                   |Dur(ms)|Result |
+--+---------------------------------+-------+-------+
|1 |[CustomerTests].[TestAddCustomer]|    127|Failure|
-----------------------------------------------------------------------------
Msg 50000, Level 16, State 10, Line 29
Test Case Summary: 1 test case(s) executed, 0 succeeded, 1 failed, 0 errored.
-----------------------------------------------------------------------------


Final thoughts

Building tests is very simple in the tSQLt test framework

Hennie


donderdag 25 april 2019

Powerdesigner series : How to organize your workspace in Powerdesigner

Introduction

In this blogpost I'll outline the concept of workspaces in Powerdesigner. A workspace is a container of models that you want to organize in a logical manner. Although, a workspace in Powerdesigner is a concept that is comparable with Visual studio solutions, there are some differences between the concepts of workspaces and visual studio solutions.

Similarities between Powerdesigner and Visual Studio projects are that you can organize different files in a container, you can use folders and store files in a hierarchy of folders. It is possible to have multiple workspaces on a machine.

Now there is also the same concept of projects. In solution explorer of Visual Studio you can create projects as in Powerdesigner. Although, I haven't been investigate projects very thoroughly yet, projects seems very different in Powerdesigner than projects in Visual studio. In Visual Studio files are organized in (one or more) project(s) in a solution, but the concept of projects in Powerdesigner is a bit more different. Projects inPowerdesigner are supposed to show relationships between models and what the dependencies are.

Start with a workspace

Let's start looking at the concept of workspaces. When Powerdesigner is started a workspace is already there (in contrast with Visual Studio).


Now you can save the workspace at a certain place on your computer and give the file a proper name.


When the workspace file is saved, a .sws file is created with the a name that you gave.


Rename a workspace

Now saving the file with another name than the standard "workspace" does not change the name in Powerdesigner. You have to rename that too.


And when you have done this, the workspace in Powerdesigner is renamed to different name.


So starting Powerdesigner and saving a Workspace at a proper place and renaming the workspace with a same name is advisable. This way there is less confusion.

Add a data model to a workspace

A next step is adding a data model to the workspace. That is possible with the menu option New > Physical Data Model (for instance).


Now a Physical Data Model is added to the Workspace. Note that there are two levels in the Wokspace added. A Physical Model and a Physical Diagram. I'll show some more examples later.


Add a folder to a workspace

Yet another option to organize models in a workspace is the usage of folders. You can use the option New > Folder.


Folders are logical organized in your workspace file and not physical. If you want to organize your model in a physical folder structure you can simply create them in the window folder and save your models there.

Organize models in folders

Models can be organized in models and now you can simply drag models to the folder and drop it there. The model (and diagram) is now present in the folder.


And organize models in a physical folder on your file system.


Adding more models and diagrams

It's also possible to organize models and diagrams in different ways in a workspace. You can add diagrams to a model and you can add separate models and diagrams. Below an example of adding another diagram to a existing model.


And off course you can add a new model/diagrams to a workspace.


If you insert different types of workspace objects to the workspace you can have something like this.


Save your workspace

You can save the workspace to disk and it can be confusing saving the models to the disk and using logical and physical folder all together. In my opinion, use only logical folders in your workspace because aligning physical and logical folders can be very difficult and confusing.


How is the sws file organized?

I've added a screenshot of the workspace file (.sws) and this organized as a XML file. Notice that not all elements of the workspace are mentioned in the file. Only one model and one diagram is stored.


Final thoughts

This blogpost was about discovering the basic options of organizing a workspace in Powerdesigner. Using workspaces have some similarities and dissimilarities with Visual Studio projects. 

Hennie

woensdag 6 maart 2019

Fact Oriented Modeling constraints (part II)

Introduction

In my previous blogpost about FOM, I've discussed the basics of FOM. In this blogpost I would like to elaborate on constraints in FOM. Constraints are important in data modelling because they limit the degrees of freedom (of the data) in the model. In this blogpost I'll describe the different constraints that can be applied to the FOM data models.

Constraints
As said before, there are different constraints possible in FOM :
  • Value Constraints.
  • Uniqueness Constraints.
  • Totality Constraints.
  • Subset Constraints.
  • Equality Constraints.
  • Mutually Exclusion Constraints.
  • Number constraints.

Value Constraints
Valueconstraints are limitations of certain labeltypes, for instance a sequencenumber can only exist of 1, 2 or 3. You can add this in CaseTalk. 


This result in the following change in the diagram. It is now visible that sequencenumber can only exist of 1, 2 or 3.


Uniqueness Constraints
Yet another constraint is uniqueness, meaning that values are unique in a population. You can do this with the menu option Set Unique Constraint in CaseTalk.


This results in the following constraint on Student, saying that there can be only one student with a firstname and a lastname.


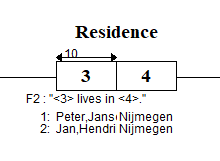
There are also other combinations possible, for instance :


Here you say that Peter Jansen is unique and this means that Peter cannot live in two places at the same time. The other way around: In Nijmegen it is possible that two students live here. So, there is not an unique constraint needed.

Another example is presented below. Here you can see that there are two unique constraints on separate columns, meaning that a student is unique and internship is unique. This means that a student can only do one internship and an internship can only be done by one student.


Here is a more complicated uniqueness constraint. In this diagram there 3 roles and two uniqueness constraints:
  • Student and internship.
  • Student and sequencenumber.

The combination of student and internship is unique. That makes sense. You can not apply twice for the same internship. The other uniqueness constraint is student and sequencenumber is also logical. A student can not apply for an internship with the same sequencenumber. The student should make an order of internships.


After determining the uniqueness constraints a couple of tests are necessary and they are organized as follows:
  • Elementary test
    • n-1 rule test
    • n rule test
    • Projection/Join test
  • Nominalisation test


Totality Constraints.
Totality constraints are constraints that says that every tuple from a role of a (nominalised) facttype should be present in a involved role. For instance: "Every student should have a place to live" meaning that when a student is known, the place is also known. If a place is not known, this is not possible in the semantics. This is not the fact. The fact is that a student has a place. So, you identify is with a totality constraint. How to set this up in CaseTalk?

I had to figure this one out but I managed to make a totality constraint. First you have to press the <CTRL> button and then click on the role you want to put a Totality constraint on.


Now when you are done, The following diagram has Totality Constraints.


Setting Totality Constraints should be handled with care, because when generating a data model with a totalityconstraints can result in a NOT NULL column.

Subset Constraints.
Subset constraints are constraints that says something about subsetting of particular roles. This states that the set of roles is a subset of another set of roles.The values of oneset of roles should be present in the other set of roles.

Let's experiment this with CASE Talk. First press on the subset constraint Icon in the top left in diagram pane.


This will show the following window and here you can enter the subset constraint with the From and To part.


And here is the result of the subset constraint.


The plotted size is a bit huge in contrast with the diagram. You can change that in the diagram with Style and Options.

And here you set the font size.


Equality Constraints.
An equality constraint is needed when two set of roles are equal. This is entered as two subset constraint and is only changed in the From and To.

Mutually exclusion constraints
Mutually exclusive constraints are constraints that are exclusive between two roles. These roles cannot have a common population. For instance, You're married or divorced. You can not be both at the same time.

Number constraints
Number constraints are constraints that limit the values in a role. For instance a student can only enter three preferences for a internship.

Final thoughts

Setting the constraints on the FOM datamodel with CaseTalk will limit the degrees of freedom in your information model and help you structure the information and ultimately a physical model.

Regards,

Hennie de Nooijer